
Irresistible Chocolate Hazelnut Twists: A Sweet Treat for Every Occasion
Picture this: a chilly Sunday morning, the aroma of freshly baked pastries wafting through the house, and the sounds of laughter and chatter filling the air. As a child, the highlight of my weekends was waking up to my mother bustling around the kitchen, preparing her famous Chocolate Hazelnut Twists. These delightful pastries quickly became our family’s comfort food, a blend of rich Nutella and crunchy hazelnuts enveloped in soft, pillowy dough. Every bite is an explosion of flavor and texture, transporting me back to those cozy mornings.
What makes these Chocolate Hazelnut Twists truly special isn’t just the divine combination of chocolate and hazelnuts; it’s the memories they evoke and the joy they bring to both baking and sharing. Unlike other recipes that can fall flat or taste overly sweet, this one strikes the perfect balance, ensuring that even those who claim not to be bakers can whip them up with ease.
In this post, I will share my tried-and-true method for making Chocolate Hazelnut Twists, including tips and tricks I’ve picked up over the years. Whether you’re looking to impress at your next brunch or just want something sweet to enjoy at home, you’ll learn how simple it can be to create a delicious treat that will become a staple in your kitchen!
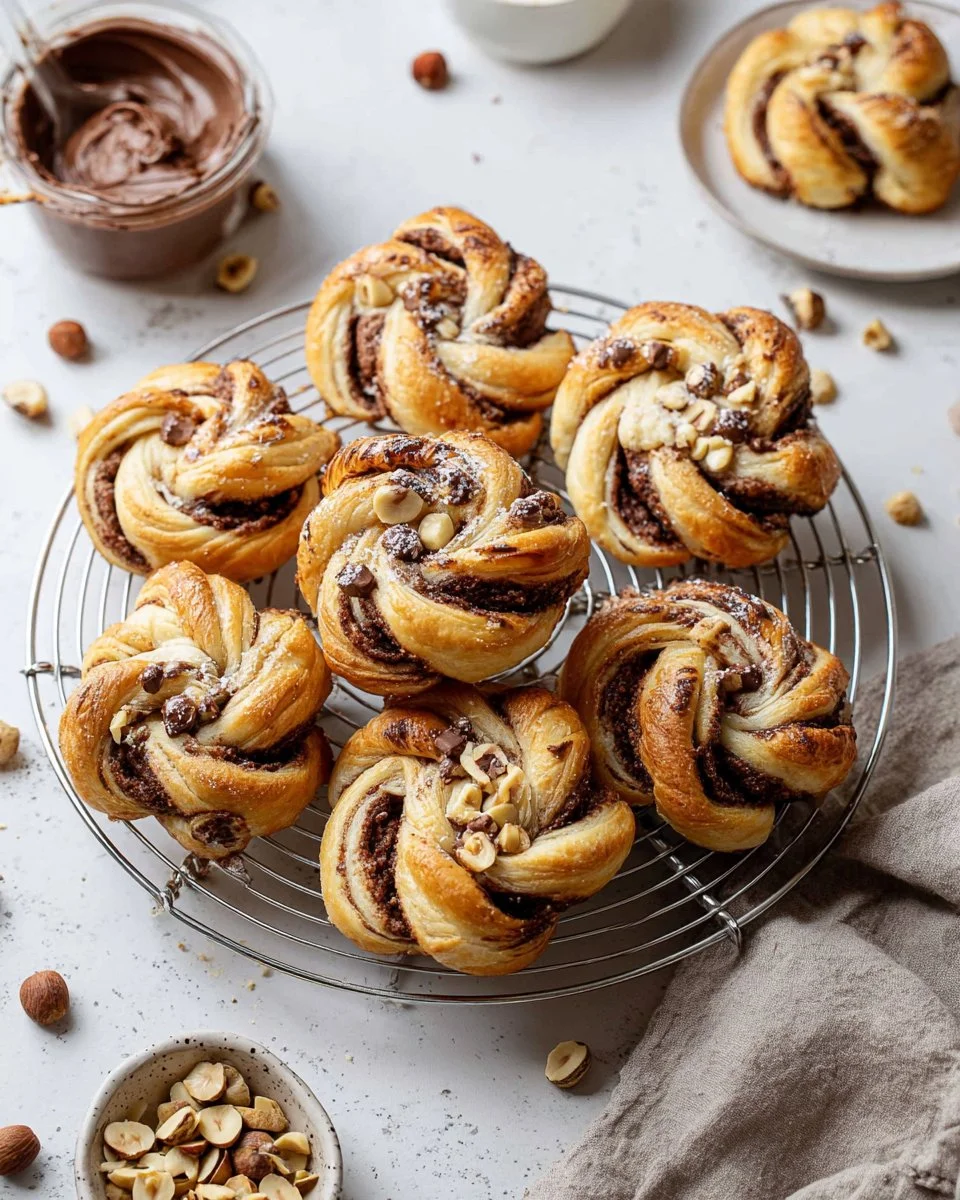
What Are Chocolate Hazelnut Twists?
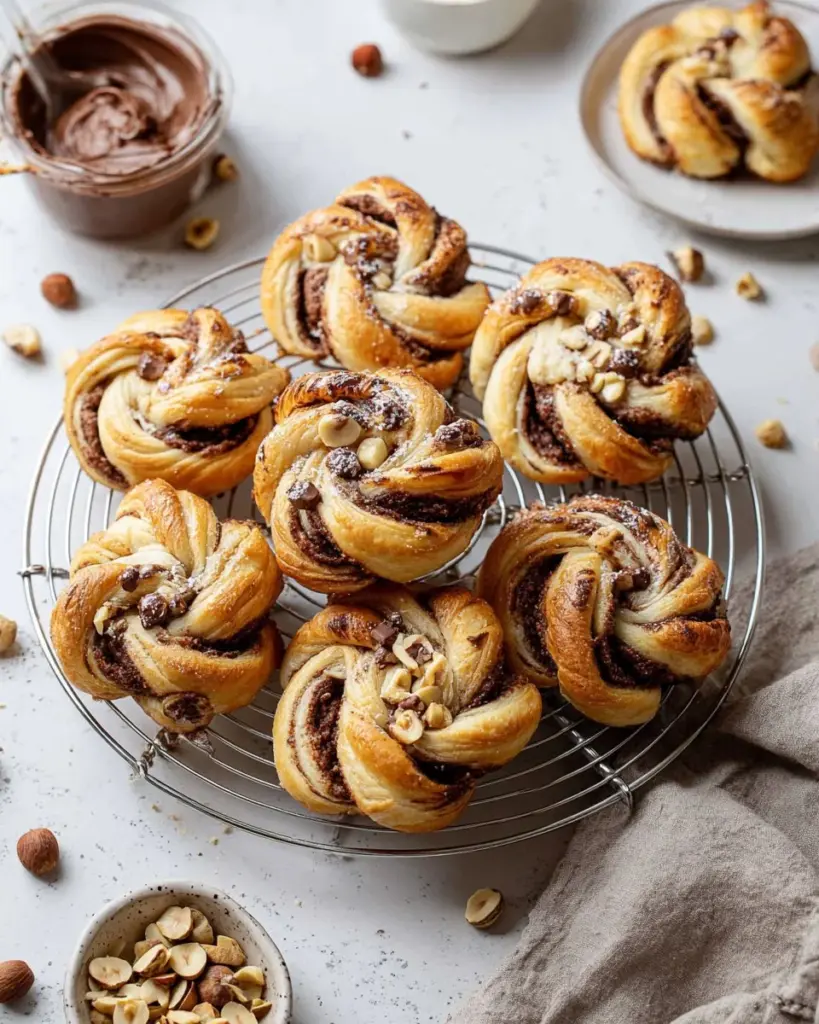
Chocolate Hazelnut Twists are a delightful pastry that originated from the classic sweet dough tradition, infused with the rich flavors of Nutella and roasted hazelnuts. Their soft, fluffy texture contrasts beautifully with the creamy chocolate filling and the subtle crunch of hazelnuts, making each bite a mouthwatering experience.
These pastries are unique due to their beautiful twisted shape, which not only looks appealing but also helps them bake evenly, ensuring a perfectly cooked treat every time. They’re not just reserved for breakfast; they can be a lovely addition to brunches, afternoon teas, or even dessert after dinner.
When you want a sweet treat that’s sure to impress but doesn’t require professional baking skills, Chocolate Hazelnut Twists are your go-to recipe. You’ll find that they’re wonderful for gatherings or just to enjoy when the craving for something sweet hits you.
Why You’ll Love This Recipe
Easy to Make: This recipe is approachable for all skill levels, whether you’re a baking novice or a seasoned pro. You’ll find that the dough comes together quickly, and the twisting technique is simple to master.
Taste Better than Store-Bought: Unlike many commercial pastries that can be overly sweet or lack freshness, homemade Chocolate Hazelnut Twists are tailored to your taste. You control the ingredients, ensuring every bite is delicious and satisfying.
Cost-Effective: Making these twists at home will save you money compared to the overpriced pastries in cafes. A batch can be made for a fraction of the cost, allowing you to enjoy more sweet moments without breaking the bank.
Customizable: While the classic Nutella and hazelnut combination is divine, feel free to experiment! Swap in different spreads, like almond butter or peanut butter, or add spices like cinnamon for a warm twist. You can also replace hazelnuts with your favorite nuts or even dried fruits.
Perfect for Any Occasion: Whether you’re planning a family brunch, a cozy coffee date, or a simple weekday treat, these twists fit perfectly. They also freeze beautifully, making them ready to bake up at a moment’s notice!
Ingredients Section

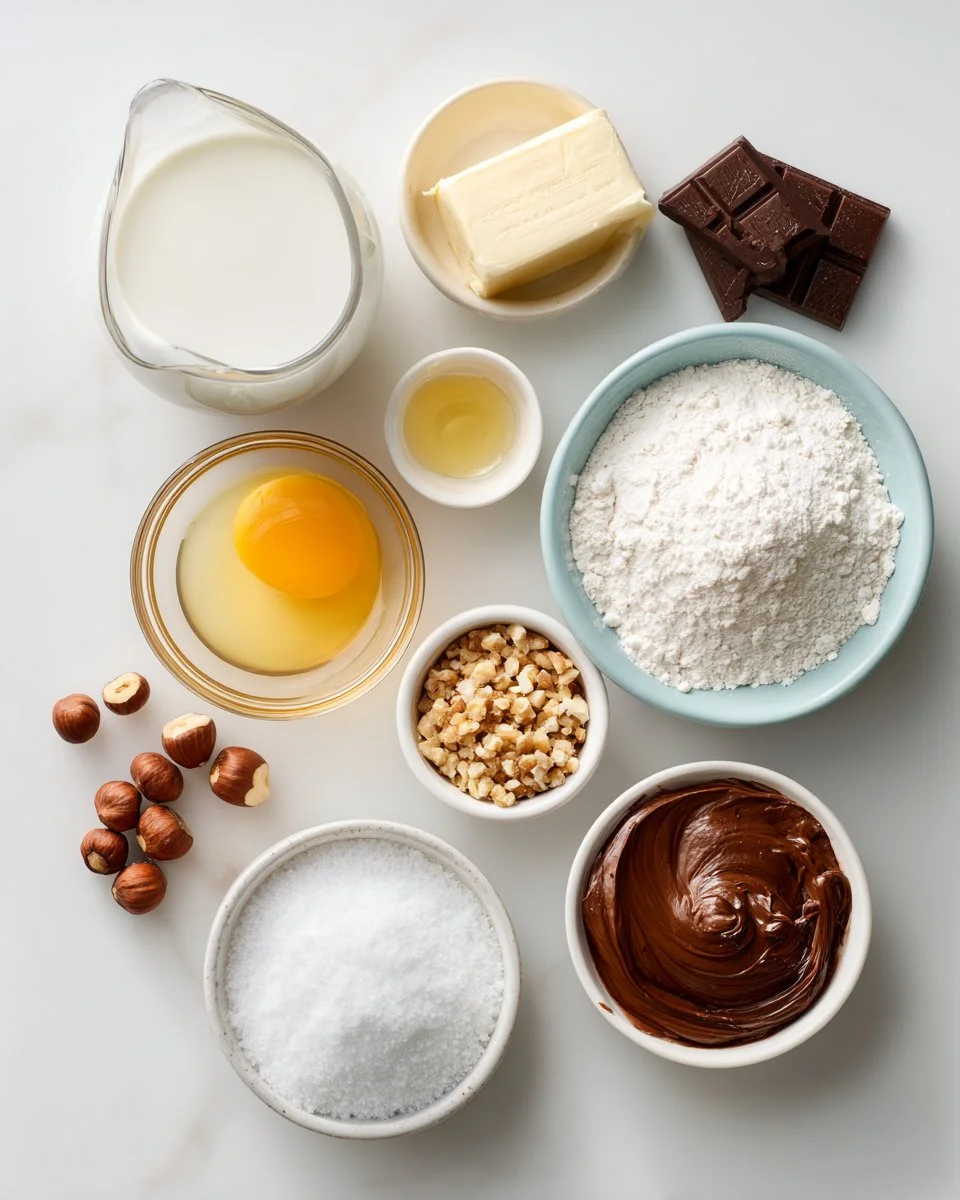
To create these Chocolate Hazelnut Twists, you will need the following ingredients:
- 1 cup (245 g) whole milk (Warm milk helps the yeast activate and gives the dough a tender texture.)
- 1/4 cup (1/2 stick / 57 g) unsalted butter, room temperature (Make sure your butter is soft for easy mixing.)
- 1 packet (2 1/4 teaspoons) active dry yeast (Fresh yeast is crucial for a good rise.)
- 4 tablespoons granulated sugar, divided (This will sweeten the dough and help with yeast activation.)
- 2 large egg yolks, room temperature (Egg yolks add richness; room temperature helps with incorporation.)
- 1/8 teaspoon kosher salt (A little salt enhances flavors.)
- 3 cups (375 g) all-purpose flour (Use high-quality flour for the best results.)
- 3/4 cup (222 g) Nutella (Feel free to warm up the Nutella slightly for easier spreading.)
- 1/4 cup (29 g) finely chopped hazelnuts (Roasting them first brings out even more flavor.)
- Confectioners’ sugar, for dusting (This adds a lovely presentation touch.)
Chef’s Tip: If you need to substitute, you can use whole wheat flour for some or all of the all-purpose flour for added nutrition, or different types of nut butters depending on your preference.
Step-by-Step Instructions
Warm the Milk and Butter: To a heat-safe dish, add milk and butter. Microwave for 1 minute, or until the butter completely melts and the mixture reaches 110 to 120 degrees F (feel free to use a thermometer!). Stir to combine.
Activate the Yeast: In the bowl of a stand mixer fitted with the dough hook attachment, combine the warm milk mixture, yeast, and 1 tablespoon granulated sugar. Let the yeast activate for about 5 minutes. You’ll know it’s ready when it’s frothy!
Mix the Dough: With the mixer on medium speed, add the egg yolks, remaining 3 tablespoons sugar, and salt. Gradually add the flour and knead for 3 to 5 minutes or until a soft, smooth dough forms. The dough should be slightly tacky but not sticky.
Let the Dough Rise: Spray a large bowl with nonstick cooking spray. Place the dough into the greased bowl and cover it with a clean towel. Let it rise in a warm environment for about an hour, or until doubled in size.
Preheat and Prepare: Preheat your oven to 375 degrees F. Spray a muffin tin with nonstick cooking spray to prevent sticking.
Roll Out the Dough: Divide the risen dough in two. Roll one half into a 14 x 10-inch rectangle on a floured surface.
Spread the Nutella: In a microwave-safe bowl, heat Nutella for about 20 seconds, or until it’s easy to spread. Spread it evenly over the dough, leaving a 1/4-inch border. Sprinkle chopped hazelnuts over the Nutella layer.
Layer and Cut: Roll out the other half of the dough into a second 14 x 10-inch rectangle and place it directly over the filled dough, sealing the edges well. Cut the layered dough into 12 strips, about 1 inch wide.
Twist Into Shape: Twist each strip into a coil and roll it into a cinnamon roll shape. Gently place each coiled twist into a muffin cup, upright.
Brush and Bake: Mix egg whites with 1 tablespoon water and brush over the tops of the twists for a golden finish. Bake for 14 to 16 minutes, or until golden brown and puffed.
Cool and Dust: Remove from the muffin cups and cool on a wire rack for about 5 minutes. Dust with confectioners’ sugar before serving warm.
Chef’s Tip: Watch them closely towards the end of baking, as oven times can vary. You want that golden-brown top!
Expert Tips & Tricks
Storage: These Chocolate Hazelnut Twists are best enjoyed fresh but can be stored in an airtight container at room temperature for up to 2 days. For longer storage, keep in the fridge for up to a week or freeze them for up to 3 months.
Make-Ahead: You can prepare the dough ahead of time and let it rise in the fridge overnight. Just be sure to bring it back to room temperature before rolling it out.
Common Mistakes to Avoid: Ensure your milk isn’t too hot when activating the yeast, as it can kill the yeast. Always check that the dough is well-kneaded for a better texture!
Flavor Enhancers: Consider adding a splash of vanilla or almond extract to the dough for an extra boost of flavor!
Troubleshooting: If the dough doesn’t rise, it could be due to old yeast. Always check the expiration date when purchasing.
Serving Suggestions
These Chocolate Hazelnut Twists are delightful on their own, but they shine even brighter when paired with a warm cup of coffee or tea. For a special occasion, consider serving them alongside a fruit platter or some homemade whipped cream for dipping. Not only will this add a delightful presentation, but it will elevate the entire experience.
Perfect for brunch parties, they play nicely with savory dishes like a quiche or cheesy egg bake, offering a perfect sweet counterpart to kick off your morning in style.
Variations & Substitutions
If you’re feeling adventurous, here are a few ideas to customize your Chocolate Hazelnut Twists:
Flavor Combinations: Swap the Nutella for chocolate almond spread or peanut butter for a different nutty twist. Consider layering in some banana slices for an added surprise!
Dietary Restrictions: If gluten-free, use a gluten-free flour blend to substitute the all-purpose flour. For a dairy-free version, opt for nut milk and coconut oil instead of butter.
Seasonal Variations: Try spicing it up in the fall with pumpkin spice mixed into the dough, or use seasonal fruit preserves as a filling during the summer!
Nutrition & Storage Info
- Prep Time: 20 minutes
- Cook Time: 16 minutes
- Total Time: 1 hour 36 minutes (including rising time)
- Yield: 12 servings
- Estimated Calories: 210 calories per twist
- Storage Instructions: Keep at room temperature for up to 2 days, refrigerate for up to a week, or freeze for up to 3 months.
FAQ Section
Can I use other types of flour?
Yes, feel free to experiment with whole wheat or spelt flour; just keep in mind this might change the texture slightly.What should I do if the dough doesn’t rise?
Ensure that your yeast is fresh and check that the milk temperature is correct when activating. If it’s too cold or too hot, it may not activate properly.Can I prepare these the night before?
Absolutely! Prepare the dough and let it rise in the fridge overnight. Bring it to room temperature before rolling and shaping.Can I freeze the twists after baking?
Yes, once fully cooled, place them in a freezer-safe bag. Reheat them in the oven at a low temperature before serving.How can I make these twists more chocolatey?
You can add chocolate chips to the filling or drizzle melted chocolate on top before serving.Can I substitute Nutella for something else?
Definitely! Try chocolate almond spread, peanut butter, or a flavored cream cheese for a different take.What’s the best way to reheat these pastries?
For the best texture, reheat in the oven at 300°F for about 10 minutes, until warmed through.Do I have to use a stand mixer?
While it makes the process easier, you can also knead the dough by hand; just ensure it’s well-combined and smooth!How do I store leftovers?
Store in an airtight container at room temperature for up to 2 days or in the fridge for up to a week.What do I serve with these twists?
They pair wonderfully with coffee, tea, or even a light fruit salad for brunch!
Conclusion
In a world of grocery store pastries, these homemade Chocolate Hazelnut Twists truly stand out—and they carry the warmth of family memories and the joy of baking. I invite you to try making them for yourself and experience the delightful combination of flavors and nostalgia. I would love to hear how they turn out for you; feel free to share your thoughts in the comments!
If you enjoyed this recipe, be sure to check out my other sweet treats on the blog, including classic cinnamon rolls and gooey chocolate chip cookies. Happy baking!
Chocolate Hazelnut Twists
Ingredients
Method
- Warm the Milk and Butter: In a heat-safe dish, add milk and butter. Microwave for 1 minute or until melted, stirring to combine.
- Activate the Yeast: In the bowl of a stand mixer, combine the warm milk mixture, yeast, and 1 tablespoon of sugar. Let it activate for about 5 minutes until frothy.
- Mix the Dough: With the mixer on medium speed, add egg yolks, remaining sugar, and salt. Gradually add flour and knead for 3-5 minutes until a soft, smooth dough forms.
- Let the Dough Rise: Place the dough in a greased bowl, cover with a towel, and let it rise in a warm environment for about an hour or until doubled in size.
- Preheat Oven: Preheat your oven to 375 degrees F and spray a muffin tin with nonstick cooking spray.
- Roll Out the Dough: Divide the risen dough in two, rolling one half into a 14 x 10-inch rectangle on a floured surface.
- Spread the Nutella: Heat Nutella for about 20 seconds until spreadable, then spread it over the dough, leaving a 1/4-inch border. Sprinkle chopped hazelnuts on top.
- Layer and Cut: Roll out the second half of the dough into another 14 x 10-inch rectangle and place over the filled dough. Cut into 12 strips, about 1 inch wide.
- Twist Into Shape: Twist each strip into a coil and roll into a cinnamon roll shape. Place each coiled twist into a muffin cup, upright.
- Brush and Bake: Mix egg whites with 1 tablespoon water and brush over the tops of the twists. Bake for 14-16 minutes until golden brown.
- Cool and Dust: Remove from muffin cups and cool on a wire rack for about 5 minutes. Dust with confectioners' sugar before serving warm.