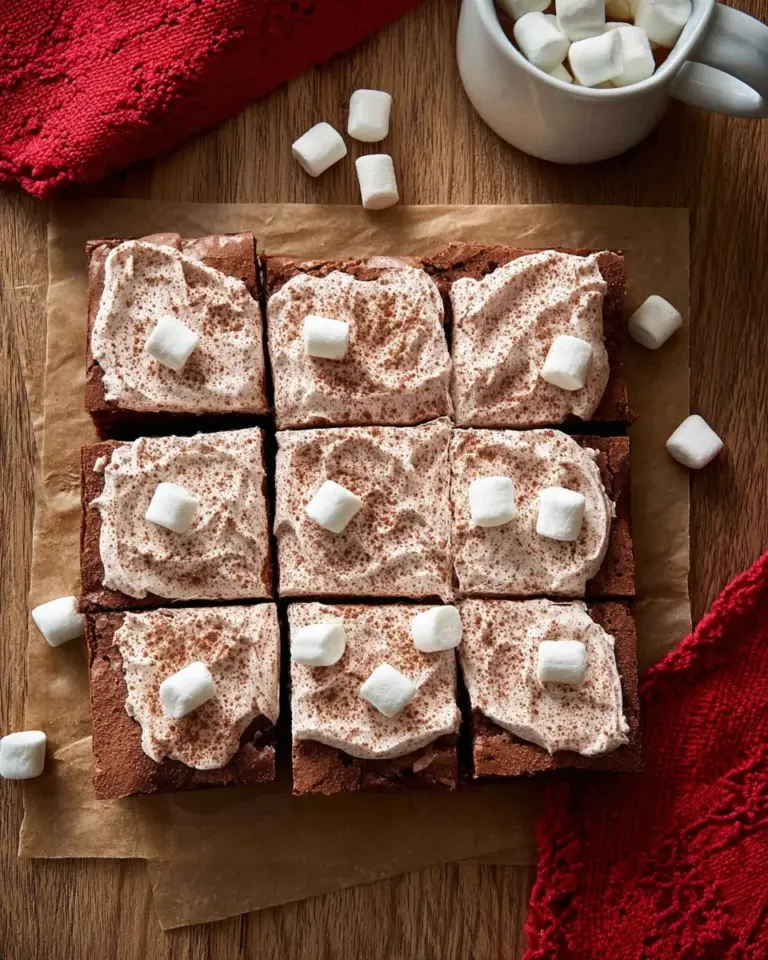

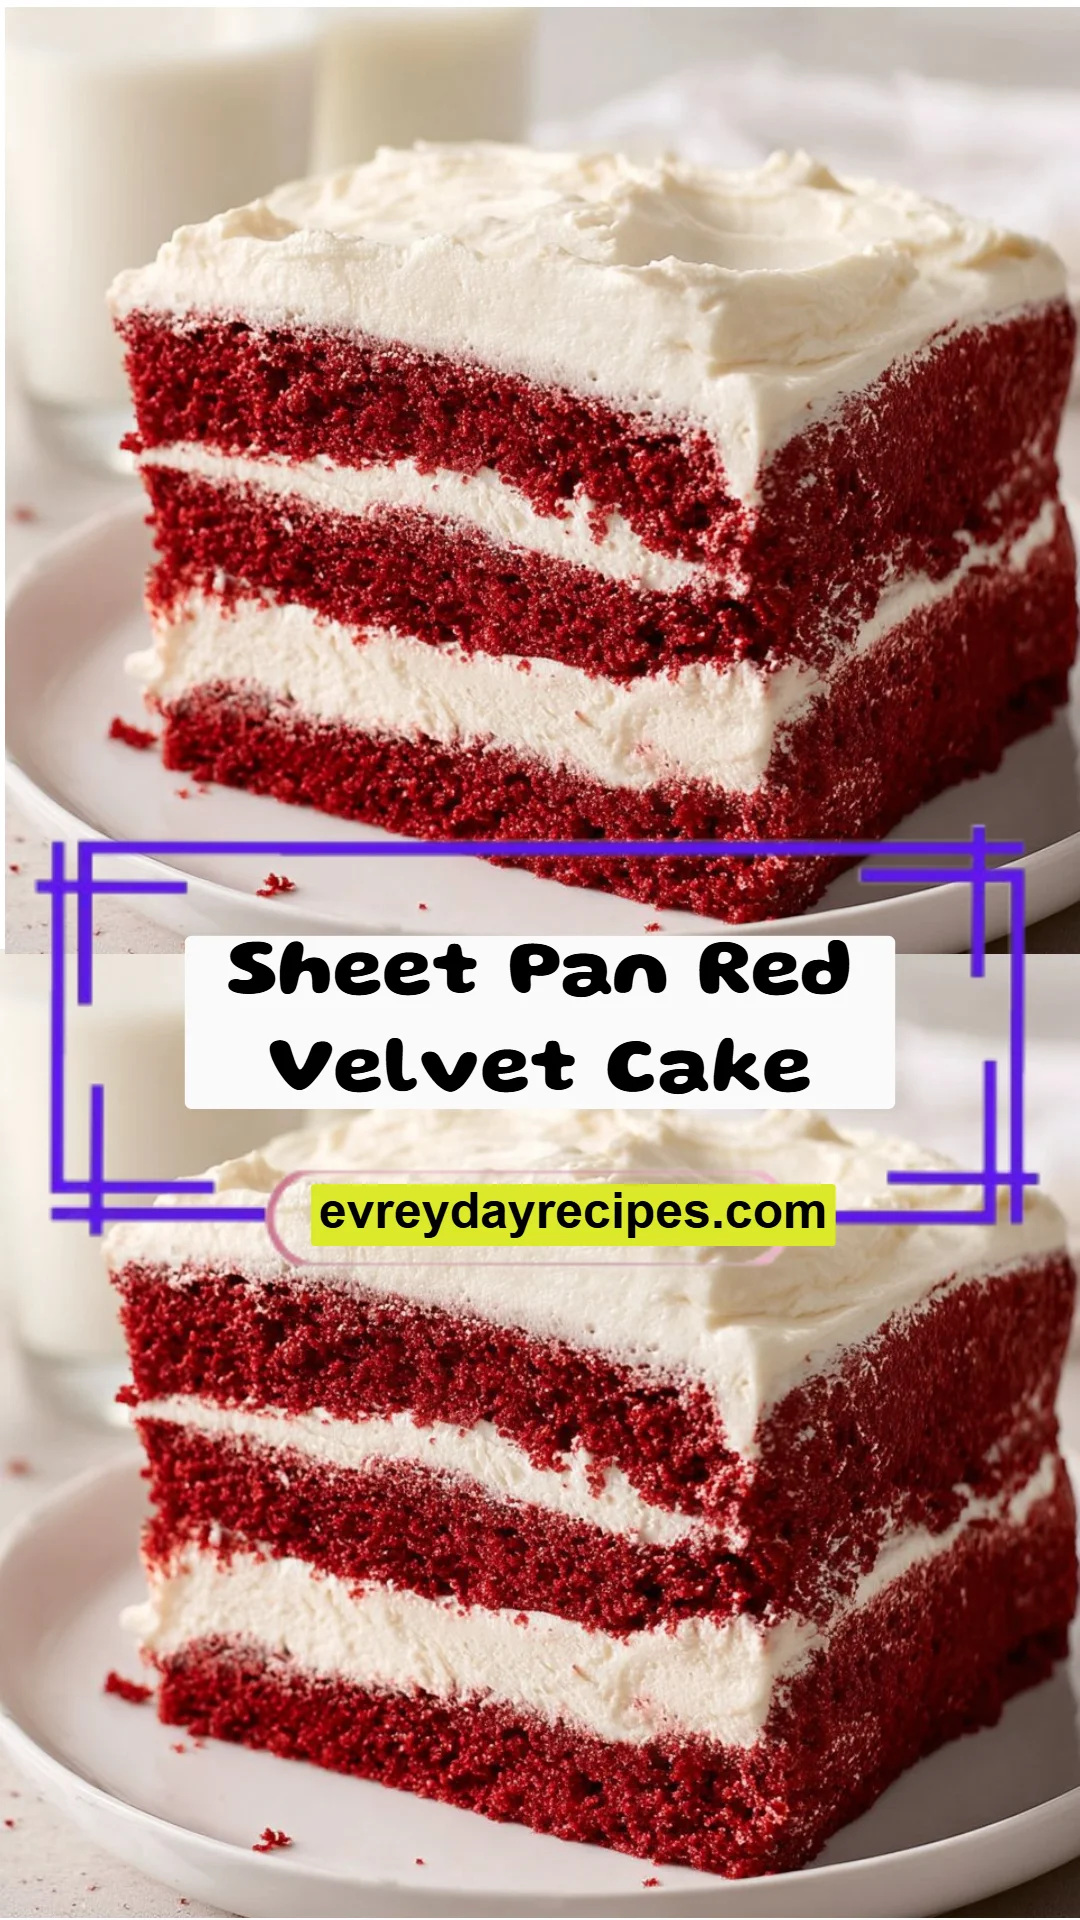
# Indulge in Happiness: Easy Sheet Pan Red Velvet Cake Recipe You Can’t Resist
## Introduction
It’s amazing how a single bite of cake can transport you back in time. I still remember the first time I tasted red velvet cake at my Aunt Lucy's birthday party. The laughter, the stories exchanged over sweet slices, and the mesmerizing blend of cocoa and vanilla flavors still linger in my mind. This **Sheet Pan Red Velvet Cake** has since become a family tradition, a celebration of love, joy, and comfort.
What makes this recipe stand out compared to others? It’s not just the vibrant color or the rich history behind it; it’s about the sheer ease of making a delightful dessert that can satisfy a crowd without taking hours in the kitchen. Tucking into a moist, velvety slice topped with creamy frosting feels like a warm hug after a long day. Plus, it’s made with ingredients you likely already have in your pantry!
In this post, I’m excited to share my favorite version of Sheet Pan Red Velvet Cake that not only dazzles in appearance but also delivers heavenly flavors. You’ll learn step-by-step how to create this stunning dessert, impressing your family and friends without breaking a sweat. Let’s dive in!
## What Are Sheet Pan Red Velvet Cakes?
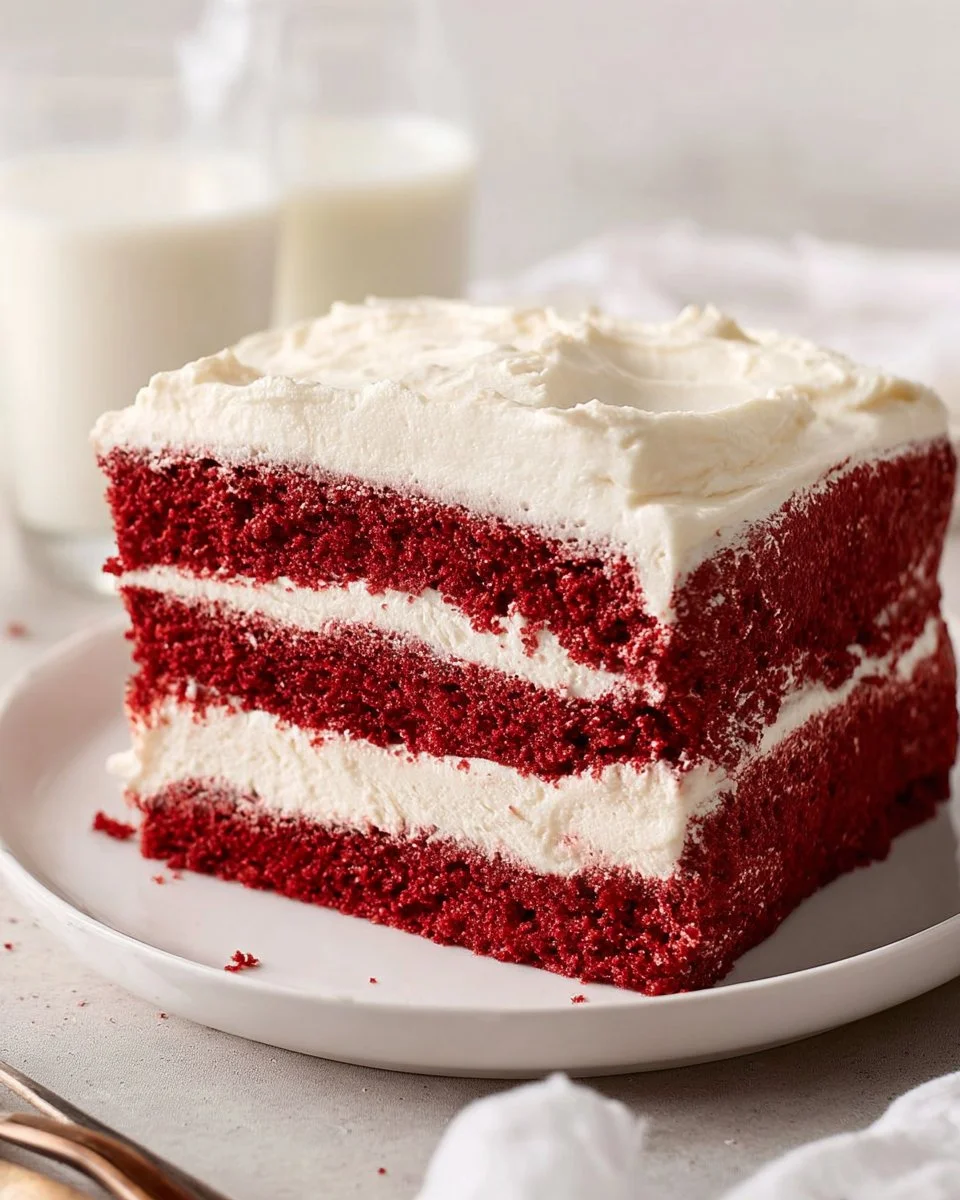
The origins of red velvet cake remain somewhat disputed, but it has become an iconic dessert, especially in Southern cuisine. Characterized by its vivid crimson color and distinct flavor combination of cocoa and vanilla, this cake usually features a velvety smooth texture that melts in your mouth. Using a sheet pan allows for easy baking and quicker serving—a perfect solution for potlucks, parties, or family gatherings.
Unlike traditional round cakes, the sheet pan version offers more surface area for frosting and enhances the cake-to-frosting ratio, ensuring each bite is luscious and satisfying. Whether you’re looking to celebrate a birthday, Valentine’s Day, or just a Tuesday night, this recipe is versatile enough for any occasion.
## Why You'll Love This Recipe
### 1. **Simplicity and Speed**
This Sheet Pan Red Velvet Cake is incredibly easy to whip up, taking less than an hour from start to finish. Unlike layer cakes, which can be intimidating and time-consuming, this recipe allows you to enjoy a beautiful dessert with minimal effort.
### 2. **Cost-Effective**
Imagine serving a stunning cake that rivals those at a bakery, but at a fraction of the cost. Most ingredients are pantry staples, making it a budget-friendly alternative to store-bought cakes that often lack warmth and personality.
### 3. **Customization Galore**
One of the best aspects of this recipe is its versatility. Want to make it dairy-free? Swap buttermilk for almond milk. Craving something nutty? Toss in some chopped pecans or walnuts for added crunch. You can easily adjust flavors and add-ins to suit your preferences.
### 4. **Designed for Crowds**
What do you do when you have a group to feed? You use a sheet pan! This recipe yields generous portions, perfect for feeding a family or a gathering where everyone will be clamoring for seconds.
### 5. **Foolproof and Fun**
With straightforward steps and ingredients, even novice bakers can achieve delectable results. Plus, the process is so enjoyable that you'll find yourself wanting to bake this cake over and over again.
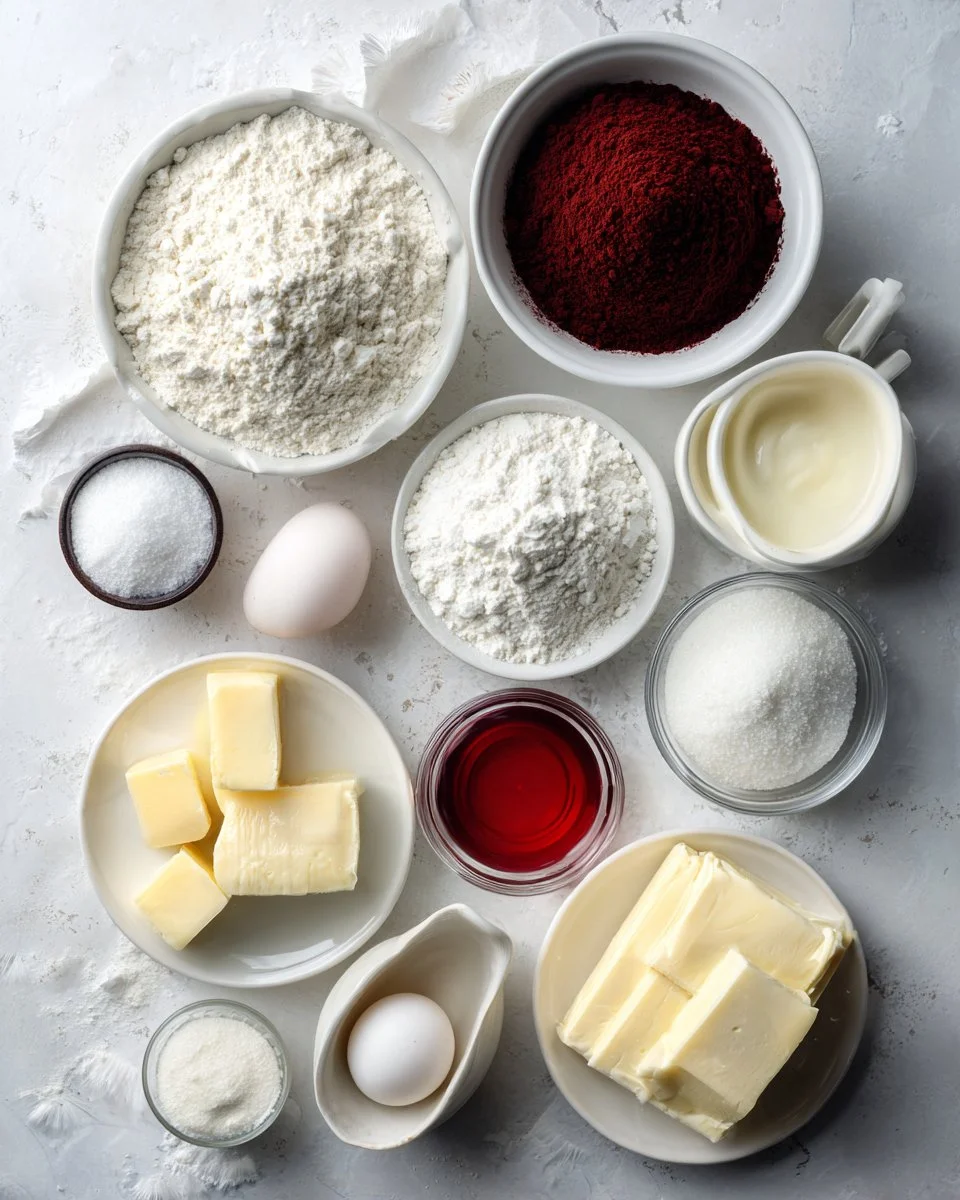
## Ingredients

To make this delightful **Sheet Pan Red Velvet Cake**, here’s what you’ll need:
### For the Cake
- **2 cups all-purpose flour**: Use a high-quality brand like King Arthur Flour for the best texture.
- **2 cups granulated sugar**: Sweetens the cake beautifully.
- **1 teaspoon baking soda**: Helps the cake rise.
- **1 teaspoon baking powder**: Ensures a fluffy texture.
- **1/3 cup unsweetened cocoa powder**: Opt for Dutch-processed for deeper flavor.
- **1 teaspoon kosher salt**: Balances sweetness.
- **1 cup mayonnaise** (room temperature): Yes, mayo! It adds moisture and richness without the need for extra oil or butter.
- **2 large eggs** (room temperature): For binding and leavening.
- **1 cup buttermilk** (room temperature): Guarantees tenderness.
- **2 teaspoons vanilla extract**: Boosts flavor profile.
- **4 tablespoons red gel food coloring**: Provides that stunning hue—gel is recommended over liquid for best results.
- **1/2 cup hot water**: Enhances batter mixing.
- **1 teaspoon distilled white vinegar**: Reacts with baking soda for lift.
### For the Frosting
- **2 cups whole milk**
- **10 tablespoons all-purpose flour**: This creates a delicious fluffy frosting.
- **2 cups unsalted butter** (room temperature): The star ingredient for creamy, smooth frosting.
- **2 cups granulated sugar**: Sweetness for the frosting.
- **2 teaspoons vanilla extract**: Adds depth to the frosting flavor.
### Notes
- Ensure all refrigerated ingredients like buttermilk and eggs are at room temperature to amalgamate smoothly.
- If you can, use high-quality cocoa powder like Valrhona for an elegant taste.

## Step-by-Step Instructions
1. **Preheat the Oven**: Begin by preheating your oven to 325°F (163°C). Line a 10x15-inch jelly roll pan with parchment paper and spray with nonstick cooking spray.
2. **Mix Dry Ingredients**: In a large bowl, whisk together the flour, sugar, baking soda, baking powder, cocoa powder, and salt until well combined.
3. **Combine Wet Ingredients**: In a medium bowl, whisk together the mayonnaise, eggs, buttermilk, vanilla extract, red food coloring, hot water, and vinegar until smooth.
4. **Combine Wet and Dry**: Pour the wet mixture into the dry ingredients and stir until just combined. Avoid overmixing for a tender cake texture.
5. **Bake**: Pour the batter into the prepared pan and spread evenly. Bake for 35-40 minutes, until a toothpick inserted in the center comes out clean.
6. **Cool Down**: Let the cake cool on a wire rack in the pan for 10 minutes, before transferring it to the fridge or freezer to chill completely.
7. **Make the Frosting**: In a saucepan, whisk the milk and flour together and cook on medium heat until thickened, stirring continually. Allow it to cool completely.
8. **Cream the Butter and Sugar**: In a large mixing bowl, beat the unsalted butter with sugar until light and fluffy, about 5 minutes. Gradually add in the cooled milk-flour mixture and continue whisking until smooth and creamy.
9. **Assemble the Cake**: Once the cake is chilled, use a knife to cut it in half horizontally. Frost the top of one half, place the other half on top, and frost the entire cake.
10. **Slice and Serve**: Serve chilled or at room temperature, slicing into squares for easy serving.
**Chef’s Tip**: Want a more pronounced cocoa flavor? Consider increasing the cocoa powder slightly.
## Expert Tips & Tricks
### 1. **Storage Recommendations**
Store leftover cake in an airtight container in the fridge for up to five days. If tightly wrapped, it lasts up to a month in the freezer.
### 2. **Make-Ahead Instructions**
You can bake the cake a day in advance. Just frost it the day you plan to serve for optimal freshness.
### 3. **Troubleshooting Common Problems**
If the cake domes too much, reduce the baking time or consider adjusting the oven temperature.
### 4. **Keeping It Moist**
To keep your cake moist if storing, place a slice of bread in the container—it’ll absorb moisture and keep your cake fresh.
### 5. **Experimenting with Flavor**
Don’t shy away from infusing spices or toppings! A hint of cinnamon or nutmeg in the frosting could elevate the flavor beautifully.
## Serving Suggestions
For the ultimate dessert experience, I recommend serving your **Sheet Pan Red Velvet Cake** with scoops of vanilla ice cream or a dollop of whipped cream. Pair it with freshly brewed coffee or a fun punch for special occasions. Present your cake on a decorative platter, and sprinkle crushed nuts or edible glitter on top for an eye-catching touch.
## Variations & Substitutions
- **Flavor Combinations**: Craving something unique? Add a hint of orange zest for a citrus kick or replace the vanilla with almond extract for a nutty flavor twist.
- **Dietary Restrictions**: For a gluten-free option, use a gluten-free flour blend. For a dairy-free variant, try almond or oat milk in place of buttermilk and use coconut cream for frosting.
- **Seasonal Variations**: Spice it up for the holidays by adding warm spices like nutmeg and ginger. You can even dye the cake a festive green for St. Patrick’s Day!
## Nutrition & Storage Info
- **Prep Time**: 20 minutes
- **Cook Time**: 40 minutes
- **Total Time**: 1 hour
- **Yield**: About 24 servings
- **Estimated Calories**: Approximately 300 calories per slice
### Storage Instructions
- **Room Temperature**: Best consumed within two days.
- **Refrigerator**: Keep for up to five days.
- **Freezer**: Lasts for about a month when wrapped properly.
## FAQ Section
1. **Can I use liquid food coloring instead of gel?**
Yes, but gel maintains a vibrant color without adding extra moisture, so it’s preferable.
2. **What’s the best way to store leftovers?**
Keep them in an airtight container in the fridge, or individually wrap slices for the freezer.
3. **Can I make this cake without mayonnaise?**
While mayonnaise makes it incredibly moist, you can substitute with 1/2 cup unsweetened applesauce or Greek yogurt if preferred.
4. **Is it okay to omit the red food coloring?**
Absolutely! You can make it chocolate flavored instead—a chocolate cake will still turn out delicious.
5. **What should I do if my cake is too dense?**
Overmixing can cause density; ensure you don’t overmix after adding the wet ingredients.
6. **How can I make my frosting fluffier?**
Ensure your butter is at room temperature. Whip it well until pale and fluffy before adding other ingredients.
7. **Can I double the recipe?**
Yes! Just make sure you have a larger sheet pan equivalent, and adjust the baking time accordingly.
8. **What other frostings work well?**
Cream cheese frosting is a classic pairing that adds a tangy twist that complements red velvet beautifully.
9. **Can I use all-purpose flour instead of cake flour?**
All-purpose flour works just fine, although cake flour will provide a lighter texture.
10. **Is this cake suitable for layering?**
Yes, you can use this recipe to create a stunning layered cake by baking in 9-inch round pans instead.
## Conclusion
This **Sheet Pan Red Velvet Cake** is more than just a dessert; it’s a celebration of life, family, and joy. Its rich flavors and easy preparation make it a must-try. I invite you to bake it, share it, and watch the smiles on your family’s faces as they indulge in this tasty treat.
I’d love to hear your feedback in the comments! What memories did this cake invoke for you? And don’t forget to check out other delicious recipes on my blog to keep the baking spirit alive!

Sheet Pan Red Velvet Cake
A simple and delightful recipe for Sheet Pan Red Velvet Cake, perfect for feeding a crowd while delivering rich flavors and a stunning appearance.
Ingredients
Method
Preparation
- Preheat your oven to 325°F (163°C). Line a 10x15-inch jelly roll pan with parchment paper and spray with nonstick cooking spray.
- In a large bowl, whisk together the flour, sugar, baking soda, baking powder, cocoa powder, and salt until well combined.
- In a medium bowl, whisk together the mayonnaise, eggs, buttermilk, vanilla extract, red food coloring, hot water, and vinegar until smooth.
- Pour the wet mixture into the dry ingredients and stir until just combined. Avoid overmixing for a tender cake texture.
Baking
- Pour the batter into the prepared pan and spread evenly. Bake for 35-40 minutes, until a toothpick inserted in the center comes out clean.
Cooling and Frosting
- Let the cake cool on a wire rack in the pan for 10 minutes, before transferring it to the fridge or freezer to chill completely.
- In a saucepan, whisk the milk and flour together and cook on medium heat until thickened, stirring continually. Allow it to cool completely.
- In a large mixing bowl, beat the unsalted butter with sugar until light and fluffy, about 5 minutes. Gradually add in the cooled milk-flour mixture and continue whisking until smooth and creamy.
- Once the cake is chilled, use a knife to cut it in half horizontally. Frost the top of one half, place the other half on top, and frost the entire cake.
Serving
- Serve chilled or at room temperature, slicing into squares for easy serving.
Notes
Ensure all refrigerated ingredients like buttermilk and eggs are at room temperature to amalgamate smoothly. Consider increasing the cocoa powder slightly for a more pronounced cocoa flavor.