
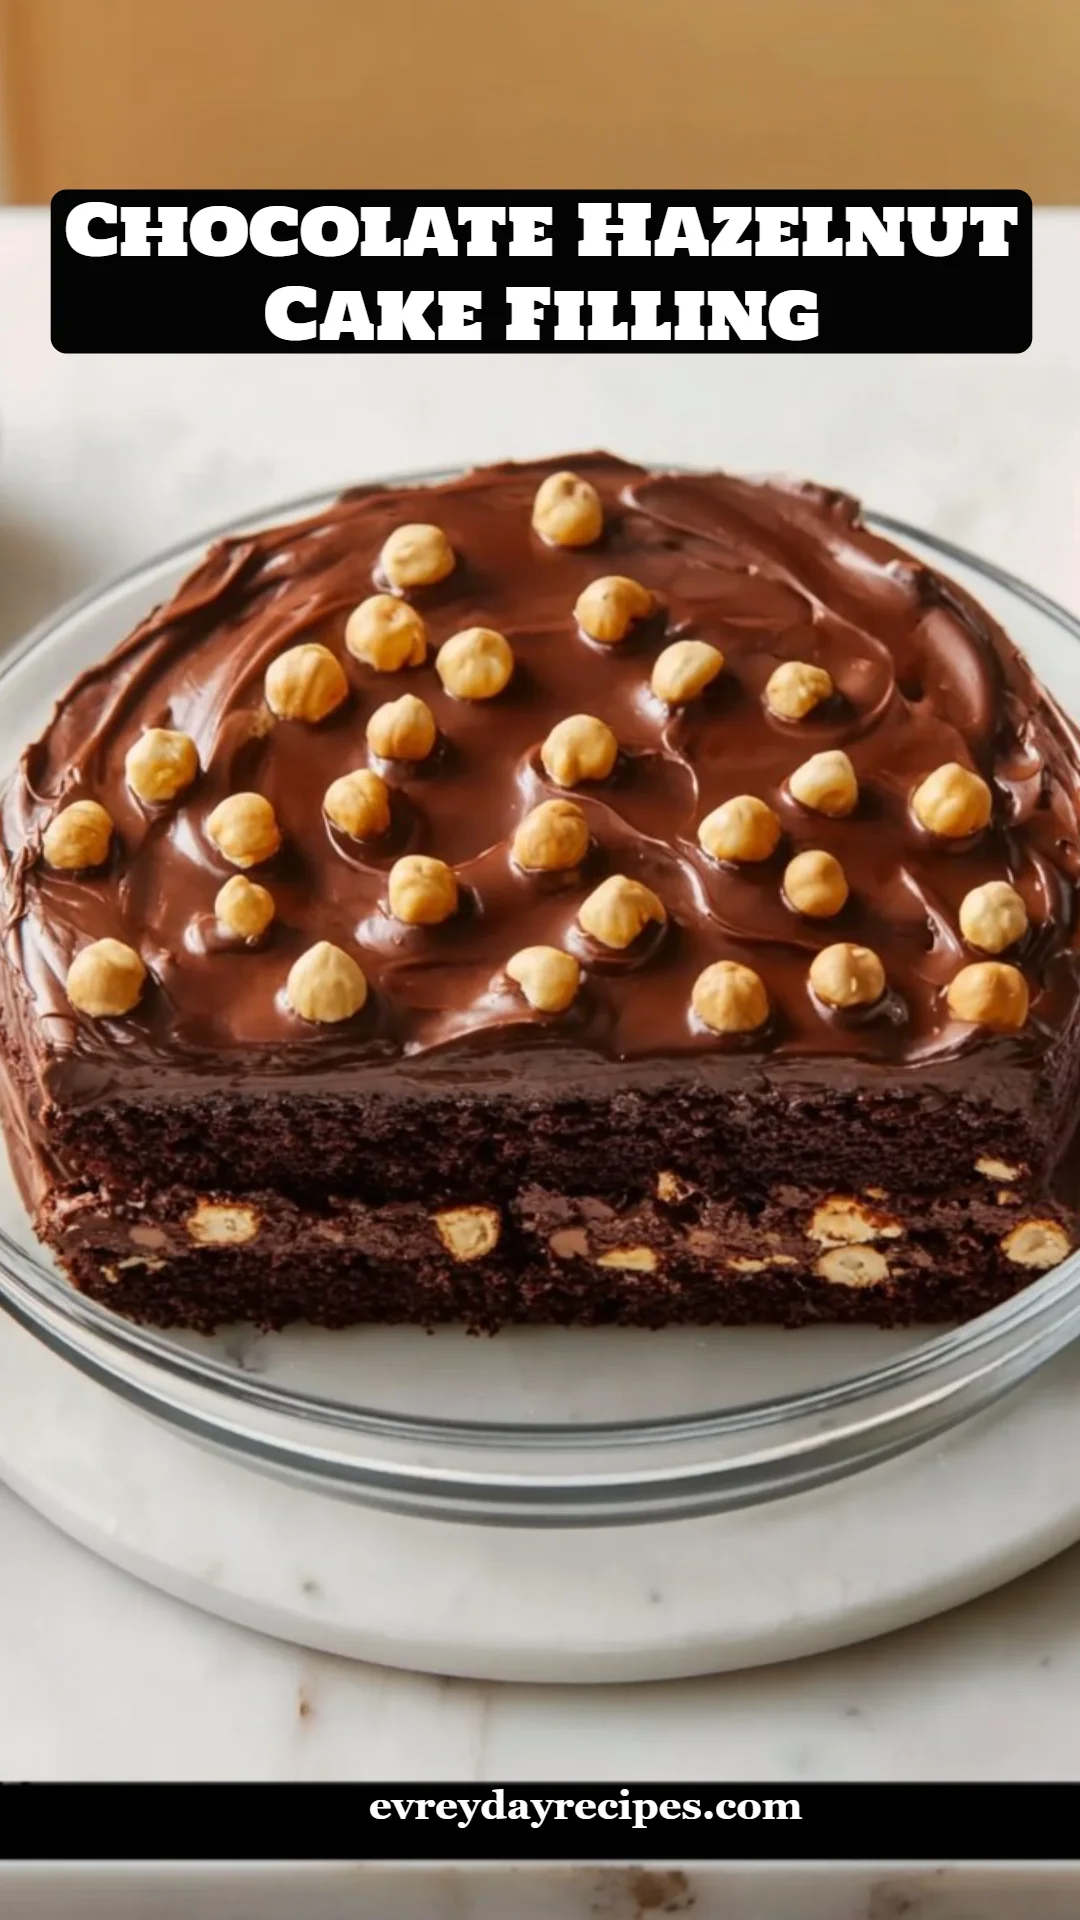
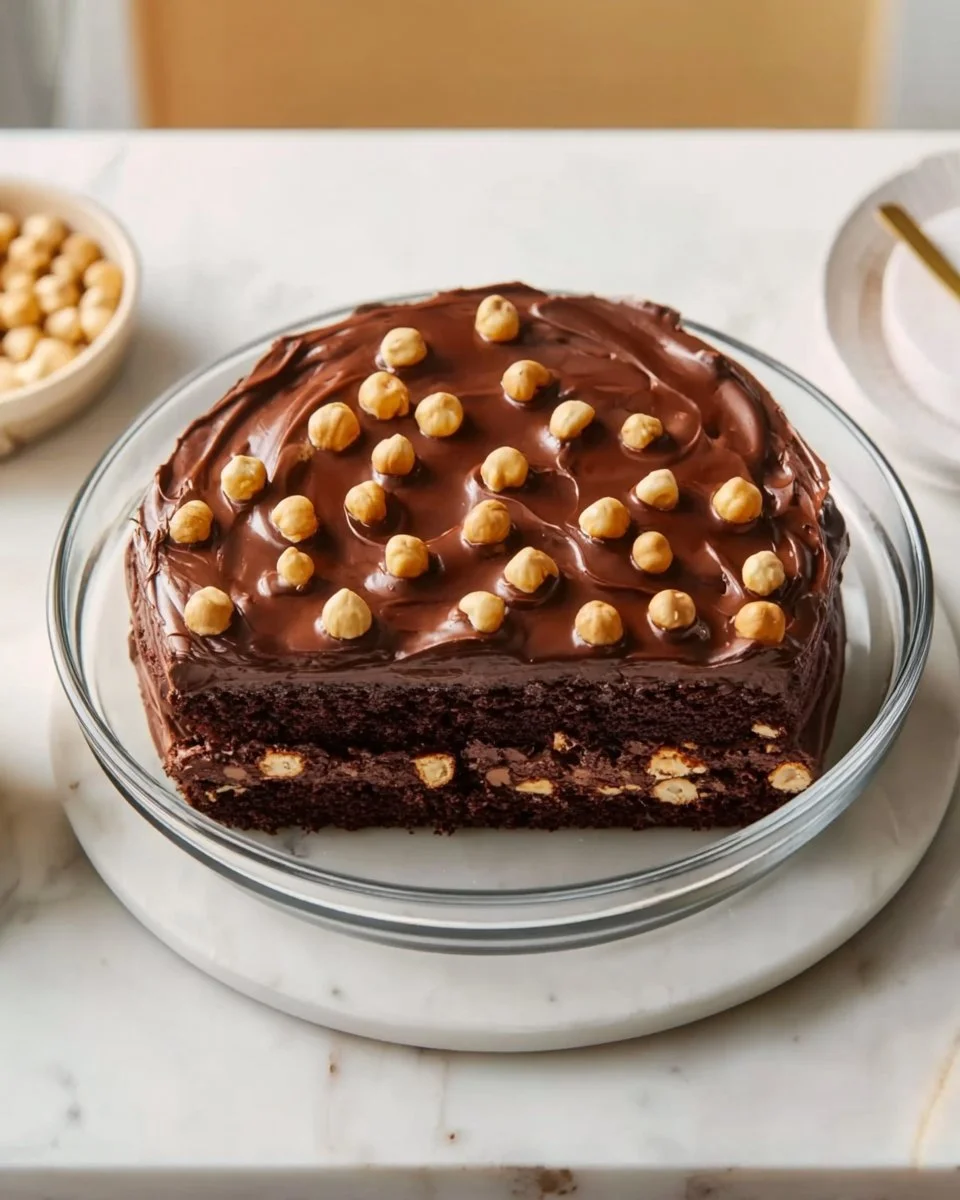
Chocolate Hazelnut Cake Filling: A Heavenly Pairing for Your Sweet Creations
Ah, chocolate and hazelnuts! Is there a more divine partnership in the dessert world? If you’ve ever savored a rich, moist chocolate cake layered with a luscious hazelnut filling, you know exactly what I mean. My journey with this delightful Chocolate Hazelnut Cake Filling began during a family gathering when I decided to upstage the usual vanilla buttercream with something unexpected. The first bite was met with hushed gasps and then an explosion of joy. People couldn’t get enough!
Why does this recipe stand out? Simple: it combines the deep, complex flavors of high-quality dark chocolate with the nutty, buttery crunch of toasted hazelnuts. While many may opt for store-bought options, making your own filling brings a warmth and authenticity that no shop can replicate. Just imagine the aroma floating through your kitchen, transporting you back to childhood memories spent baking with loved ones. Trust me, once you try this recipe, you’ll find it hard to go back to anything else.
In this post, I promise to guide you through each step of creating this mouthwatering Chocolate Hazelnut Cake Filling, from selecting the right ingredients to mastering the technique. You’ll find that it’s not only easy to whip up but also endlessly versatile—perfect for cakes, cupcakes, or even straight from the bowl on a spoon!
What Are Chocolate Hazelnut Cake Fillings?
The origins of chocolate hazelnuts can be traced back to Europe, where playful combinations of nuts and chocolate have graced tables for centuries. The taste profile of a Chocolate Hazelnut Cake Filling is a decadent amalgamation of creamy, rich chocolate with the warm, earthy notes of toasted hazelnuts. You’ll experience a delightful contrast between the smooth texture of the chocolate ganache and the satisfying crunch of nuts.
What makes this filling unique is its perfect balance of sweet and nutty flavors, creating a canvas that enhances any dessert. Whether you’re celebrating a birthday or simply indulging on a gloomy Sunday, this filling is the perfect way to elevate your dessert game.
When and Why to Make Chocolate Hazelnut Cake Filling
This delightful filling is ideal for special occasions, family gatherings, or even just a day when you’re craving something indulgently sweet. Whenever you need to impress guests or treat yourself, this Chocolate Hazelnut Cake Filling will certainly charm and satisfy.
Why You’ll Love This Recipe
1. Unmatched Flavor
You can forget about store-bought fillings—this homemade Chocolate Hazelnut Cake Filling will knock your socks off! By using high-quality dark chocolate (I recommend Lindt or Ghirardelli for a rich cocoa hit), you get a flavor profile that’s deep and complex.
2. Cost-Effective
Making this filling at home is not only a gourmet experience, but also friendly to your wallet. Store-bought options can cost a fortune for minimal quality, while this easy recipe allows you to create enough filling for several cakes at a fraction of the price.
3. Customization Galore
Want to add a splash of espresso for a mocha twist? Or how about a sprinkle of sea salt to enhance those luscious flavors? With this recipe, you have the freedom to personalize your filling to suit your taste preferences or dietary restrictions.
4. Beginner-Friendly
Even if you’re not a seasoned baker, you’ll find the instructions straightforward and easy to follow. With just a few ingredients and a little patience, you’ll impress yourself!
5. Make Ahead Convenience
This filling can be made in advance and stored in the fridge until you’re ready to use it. That means less stress on baking day!
Ingredients
- 200 g dark chocolate (60-70 percent cocoa), chopped (I suggest opting for high-quality brands like Callebaut or Valrhona for the best taste)
- 150 ml heavy cream (ensure it’s fresh for optimal flavor)
- 2 tablespoons unsalted butter (room temperature for easy incorporation)
- 3 tablespoons powdered sugar, adjust to taste (this can be reduced or increased based on your sweetness preference)
- 1 teaspoon vanilla extract (pure, not artificial for richer flavor)
- 100 g toasted hazelnuts, whole or roughly chopped (for the best crunch, toast your own)
- Pinch of salt (to enhance the chocolate flavor)
Ingredient Quality Notes:
- Always choose the freshest ingredients. For the best results, use organic cream and high-quality chocolate.
- Both the chocolate and hazelnuts can be substituted based on preference, but keep in mind that quality truly matters for flavor.
Step-By-Step Instructions
Preheat and Toast: Preheat your oven to 180 degrees C (350 degrees F). Spread the hazelnuts on a baking sheet and toast for 8-10 minutes, stirring halfway through until they’re fragrant and golden brown. Keep an eye on them; burnt hazelnuts are a sad disaster!
Chef’s Tip: Wrap the toasted hazelnuts in a clean kitchen towel and rub them lightly to remove their skins for a smoother texture.
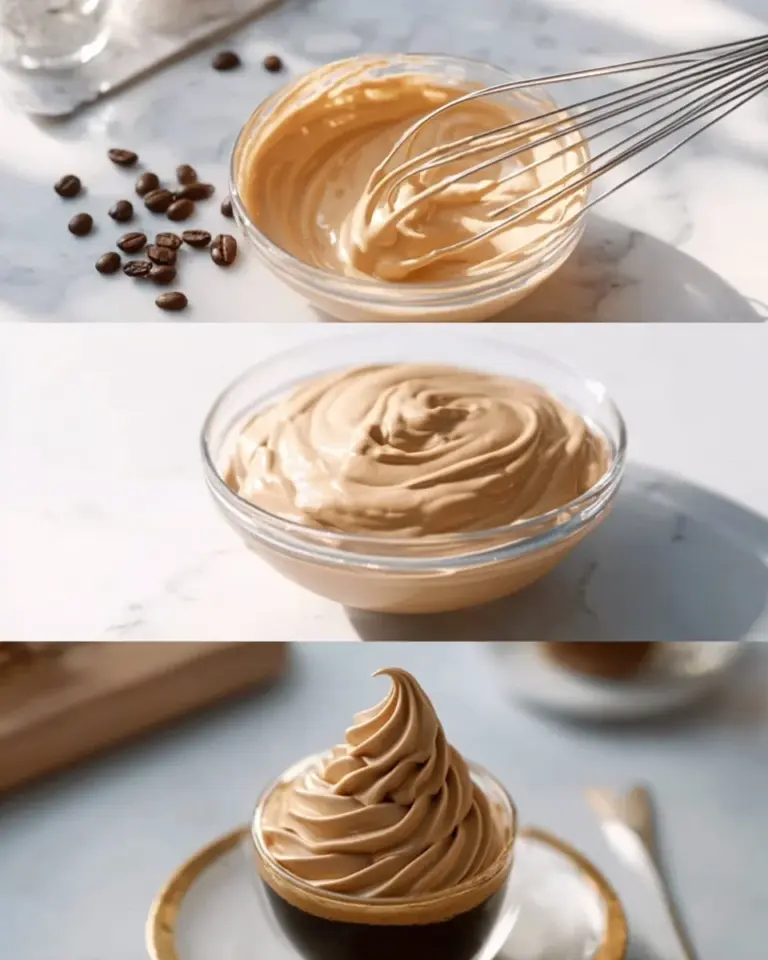
Heat the Cream: In a saucepan, heat the heavy cream over medium-low heat until it simmers—but don’t let it boil! This step is crucial as it will make your chocolate melt beautifully.
Melt the Chocolate: Pour the hot cream over the chopped dark chocolate. Let it sit for 1-2 minutes to soften, then stir with a spatula until smooth. You should see a glossy blend, and that aroma? Pure magic.
Visual Cue: The mixture should be silky without any lumps of chocolate.
Add Other Ingredients: Mix in the room-temperature butter, powdered sugar, vanilla extract, and salt, stirring until fully combined.
Incorporate Hazelnuts: Gently fold in the toasted hazelnuts until evenly distributed.
Cool: Allow the filling to cool at room temperature for a plush texture or refrigerate it for at least one hour for a firmer consistency.
Spread: Once cooled, grab your favorite cake and spread this Chocolate Hazelnut Cake Filling generously between the layers!
Common Mistake: If your mixture is too runny, you may not have waited long enough for it to cool or incorporate all the ingredients properly.
Expert Tips & Tricks
Storage: This filling can be stored in an airtight container in the fridge for up to one week or in the freezer for up to three months.
Make-Ahead: Prepare it a day in advance to save time—just make sure to bring it to room temperature before using.
Consistency Troubles?: If the filling is too thick, add a splash more warm cream to loosen it up. If it’s too runny, refrigerate until it firms up.
Flavor Boosters: Want a nutty accent? Add a tablespoon of hazelnut extract for an extra layer of flavor.
Leftover Ideas: Spread it on toast, dip fruits in it, or simply enjoy it by the spoonful!
Presentation: For an elegant touch, sprinkle the top of your filled cake with crushed hazelnuts or drizzle with melted chocolate.
Serving Suggestions
This Chocolate Hazelnut Cake Filling pairs beautifully with a variety of desserts. Serve your chocolate cake alongside a scoop of vanilla ice cream, or add a dollop of whipped cream for an extra treat. For a festive touch, garnish your cake with fresh berries—think strawberries or raspberries—to create a stunning contrast!
Occasion Recommendations
Whether it’s a birthday, anniversary, or just a cozy dessert night in, this filling will make any day feel special.
Variations & Substitutions
- Different Flavor Combinations: Add a hint of orange zest for a citrus twist, or mix in a spoonful of your favorite liqueur for an adult twist.
- Dietary Restrictions: Use dairy-free chocolate and cream for a vegan adaptation without sacrificing flavor.
- Seasonal Variations: In the fall, try adding a pinch of cinnamon and nutmeg for a warm spice profile that’s perfect with pumpkin cake.
Nutrition & Storage Info
- Prep time: 15 minutes
- Cook time: 10 minutes
- Total time: 25 minutes
- Yield: Approximately 2 cups (enough for a 2-layer cake)
- Estimated calories per serving: 120 calories (1 tablespoon)
Storage Instructions
- Room Temperature: Best consumed within 2 days if left out.
- Fridge: Lasts up to a week.
- Freezer: Can be frozen for three months.
FAQ Section
Can I use milk chocolate instead of dark?
Absolutely! It will yield a sweeter flavor, which some might prefer, but remember to reduce the powdered sugar accordingly!How can I make this filling nut-free?
Simply omit the hazelnuts and consider adding a dash of almond extract for a different flavor profile.Is this filling suitable for frosting a cake?
While it can be used as a frosting, it’s best suited for layering between cakes. If you want it to be a frosting, allow it to cool longer for a firmer consistency.Can I double the recipe?
Yes! Just ensure you have a large enough bowl for mixing and space in your fridge or freezer as needed.My filling turned out too thick. What can I do?
Gently reheat it in the microwave for a few seconds or add a touch of warm cream to help loosen it up.How do leftovers hold up?
They taste just as delicious stored properly! Just remember to let refrigerated filling come to room temperature before use.Can I make this ahead of time?
Definitely! It tastes fantastic when made a day ahead, allowing the flavors to meld beautifully.What cakes go well with this filling?
Rich chocolate, vanilla, or even a spice cake are excellent choices!How do I achieve a shiny finish for the filling?
The secret is in the quality of chocolate and allowing the ganache to cool slowly before spreading!Can I use this filling in brownies?
Yes! You can scoop a dollop of filling into the center of brownie batter before baking for a surprise chocolate hazelnut experience.
Conclusion
This Chocolate Hazelnut Cake Filling holds a special place in my heart and kitchen, and I know it will in yours too once you give it a try! Its rich flavors and customizable nature make it a must-have recipe for any dessert lover. I encourage you to dive into this delightful world of chocolate and hazelnut—your friends and family will surely be impressed!
Please leave feedback or questions below; I love hearing from fellow bakers! If you enjoyed this recipe, check out my other delicious creations, like my Classic Chocolate Cake or Hazelnut Meringue Cookies. Happy baking!

Chocolate Hazelnut Cake Filling
Ingredients
Method
- Preheat your oven to 180 degrees C (350 degrees F). Spread the hazelnuts on a baking sheet and toast for 8-10 minutes, stirring halfway through until they’re fragrant and golden brown.
- Wrap the toasted hazelnuts in a clean kitchen towel and rub them lightly to remove their skins for a smoother texture.
- In a saucepan, heat the heavy cream over medium-low heat until it simmers, but don’t let it boil.
- Pour the hot cream over the chopped dark chocolate. Let it sit for 1-2 minutes to soften, then stir with a spatula until smooth.
- Mix in the room-temperature butter, powdered sugar, vanilla extract, and salt, stirring until fully combined.
- Gently fold in the toasted hazelnuts until evenly distributed.
- Allow the filling to cool at room temperature for a plush texture or refrigerate it for at least one hour for a firmer consistency.
- Once cooled, spread the Chocolate Hazelnut Cake Filling generously between cake layers.