
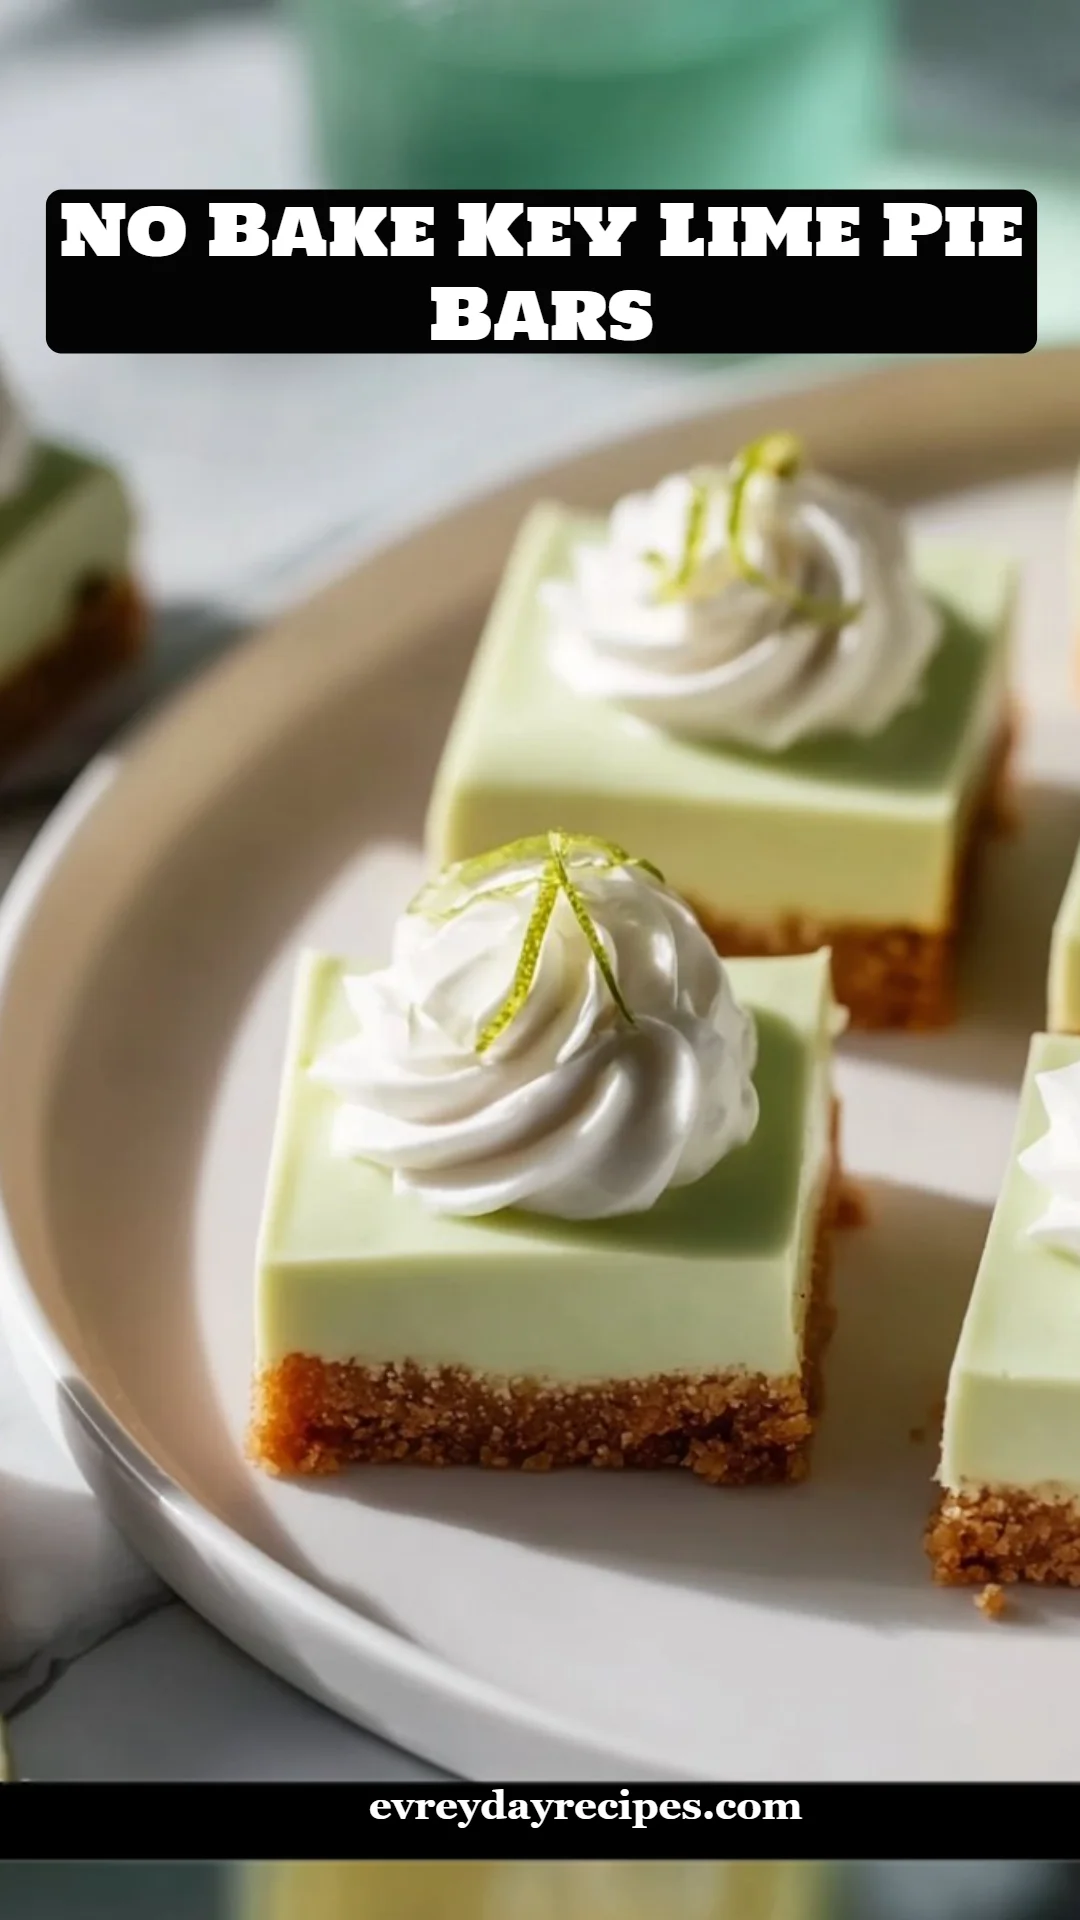
No Bake Key Lime Pie Bars: A Refreshing Twist on a Classic Dessert
If you’re anything like me, the thought of biting into a creamy, zesty slice of key lime pie transports you straight to sun-kissed beaches and lazy summer days. However, when I stumbled upon a recipe for No Bake Key Lime Pie Bars, I was intrigued. The idea of getting all that refreshing tartness without the need for baking? Sign me up! This recipe quickly became a family favorite—perfect for family gatherings, after-dinner treats, or just to satisfy a midweek craving.
What makes these bars so special is their perfect balance of creamy sweetness and zesty lime flavor. They’re not just easy to make; they’re a delightful no-fuss treat that everyone will love. Forget about the hassle of baking and cooling pie crusts; with these bars, you can whip up something incredible in no time. What sets my recipe apart is the cream cheese which gives the filling a delightful richness that perfectly complements the tartness of key limes. I promise, after you make these, you’ll want to keep the recipe on speed dial. Today, I’ll guide you through creating these irresistible No Bake Key Lime Pie Bars, ensuring that you have a treat that evokes nostalgia and joy in every bite.
What Are No Bake Key Lime Pie Bars?
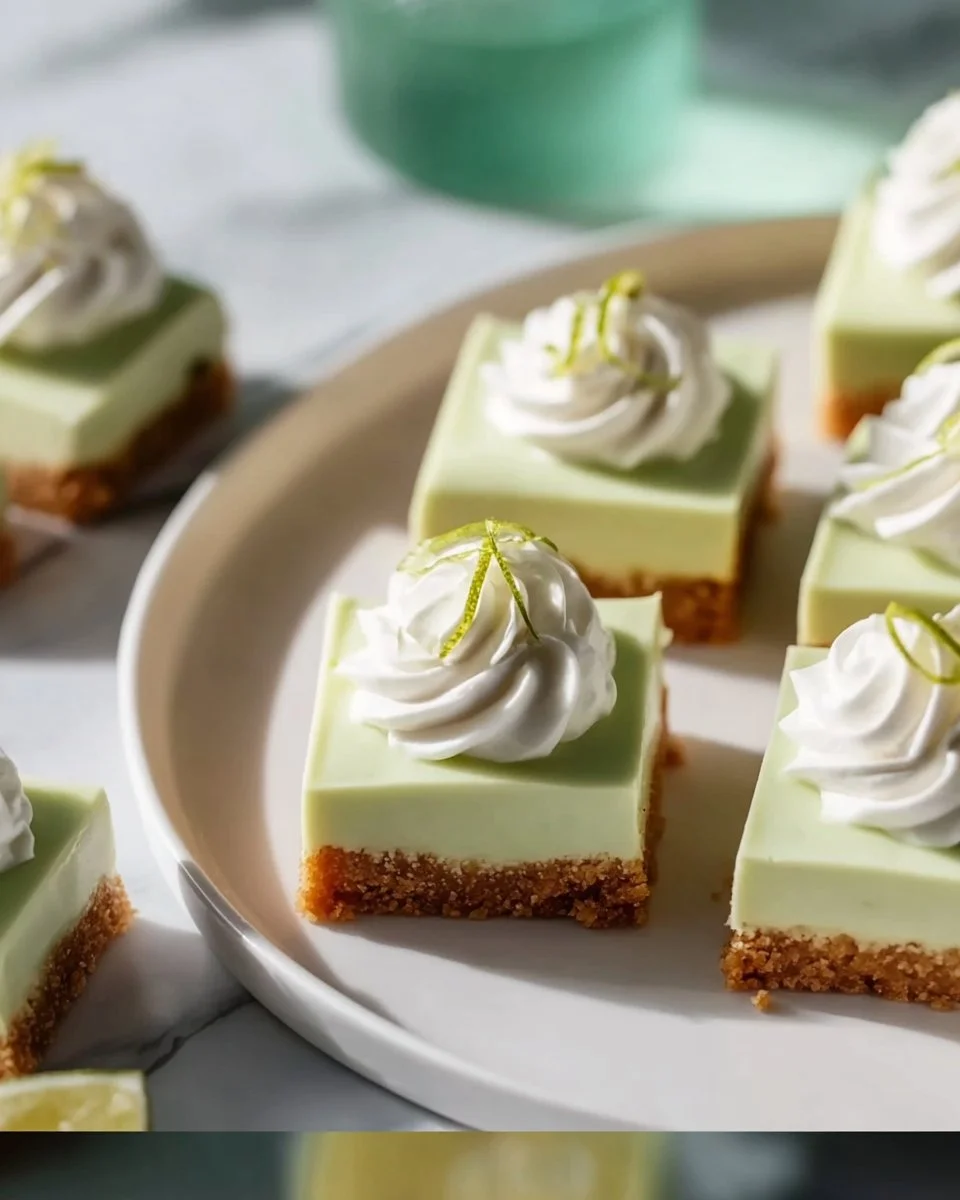
No Bake Key Lime Pie Bars are a delightful dessert that embraces the bright, tangy flavors of key limes without requiring an oven. Originating from the classic key lime pie, these bars take the essential elements— creamy filling, zesty lime, and a crumbly crust—but offer them in a more portable, bar-like form. The buttery and slightly sweet graham cracker crust provides a perfect base that complements the silky filling.
The texture is a harmonious blend of creamy and crumbly—with the filling melting in your mouth while the crust offers just the right crunch. These bars are not just for summer; they’re ideal for any occasion that calls for a refreshing dessert. Whether you’re hosting a barbecue, celebrating a birthday, or need a sweet treat to brighten up a rainy day, No Bake Key Lime Pie Bars cover all the bases.
Why You’ll Love This Recipe
Irresistibly Easy: With just a handful of ingredients and no baking required, you can whip these up in a flash. This recipe is not only easy but also foolproof, ensuring you’ll impress your family with minimal effort.
Cost-Effective: Comparatively cheaper than store-bought desserts, making these bars feels like a small indulgence that won’t break the bank. You’d be surprised how little you need to spend for a dessert that looks and tastes gourmet!
Customization Options: This recipe is a blank canvas for your creativity. Want to make it even tangier? Add extra lime juice! Prefer a sweeter taste? A dollop of extra sugar does wonders. You can even switch up the graham cracker crust with oreos for a different flavor profile!
Perfect for Any Occasion: From summer picnics to holiday gatherings, these bars are versatile enough to fit any season. They make a delightful dessert to share or keep all to yourself—no judgments here!
Kid-Friendly: The no-bake process makes it an easier task for the little ones to help in the kitchen. Plus, they’re a great way to introduce kids to cooking—who wouldn’t love helping to make a sweet treat?
The simple combination of tangy key lime and creamy filling will make these bars feel like a mini-vacation for your taste buds!
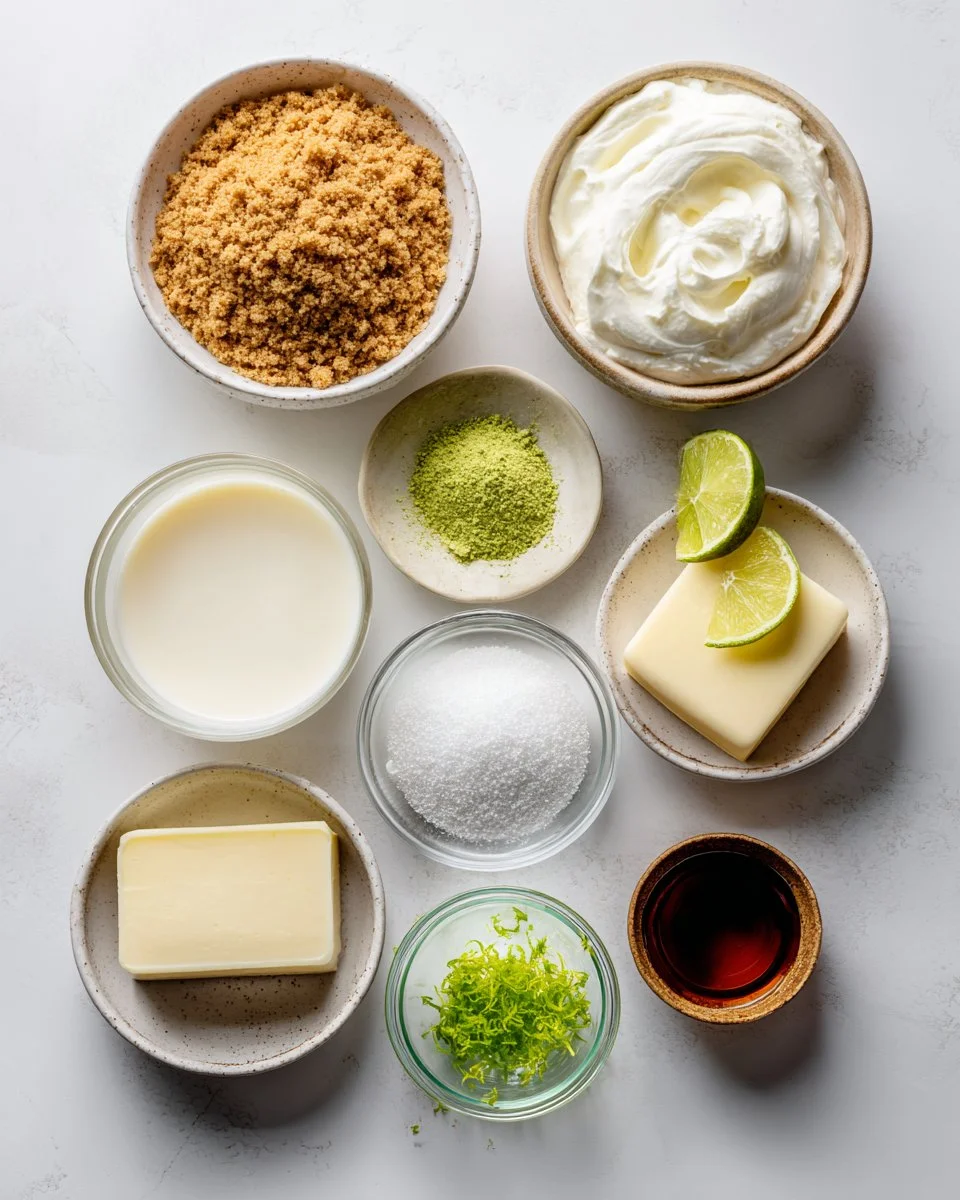
Ingredients
For the Crust:
- 2 cups graham cracker crumbs (Opt for Honey Maid for a classic flavor)
- 1/2 cup melted butter (Use unsalted)
- 1/4 cup granulated sugar (Simple white sugar works best)
For the Filling:
- 1 can (14 oz) sweetened condensed milk (Eagle Brand is my go-to)
- 1/2 cup fresh key lime juice (Or regular lime juice if key limes are hard to find)
- 1 tablespoon lime zest (Fresh zest gives the best flavor)
- 8 oz cream cheese, softened (Philadelphia is a trusted brand)
- 1 teaspoon vanilla extract (Pure vanilla enhances the taste)
- 1-2 drops green food coloring (Optional for that perfect lime hue)
For the Topping:
- 1 cup heavy whipping cream (Use a high-fat content for better whipping)
- 2 tablespoons powdered sugar (For sweetness and stabilization)
- Extra lime zest for garnish
Prep Notes: Ensure the cream cheese is at room temperature for a smooth filling. If you’re using frozen butter, let it sit out until softened or microwave for a few seconds to soften (not melt).
Step-by-Step Instructions
Prepare the Crust: Combine the graham cracker crumbs, melted butter, and granulated sugar in a medium-sized bowl. Mix until it resembles damp sand. Chef’s Tip: If you want an extra crumby texture, feel free to pulse your graham crackers in a food processor before mixing in the butter and sugar. Firmly press the crumb mixture into a lined square pan (an 8×8 inch pan works well). Refrigerate for at least 10 minutes.
Make the Filling: In a large mixing bowl, beat the softened cream cheese using an electric mixer until smooth and creamy. Gradually add the sweetened condensed milk, mixing until incorporated.
Add Zest and Juice: Gently fold in the fresh lime juice, lime zest, vanilla extract, and food coloring. Timing Tip: This step takes only about a minute or two! Be careful not to overmix as the filling should remain fluffy.
Assemble: Pour the luscious filling over the chilled crust. Use a spatula to spread it evenly.
Chill: Cover the pan with plastic wrap and chill in the refrigerator for at least 4 hours (or overnight) until the filling is firm.
Whip the Cream: Once the filling is set, in a mixing bowl, whip the heavy cream with powdered sugar until soft peaks form—about 3-5 minutes.
Serve: Cut the dessert into squares. Add a swirl of whipped cream on each bar and garnish with a sprinkle of lime zest. Enjoy!
Common Mistakes to Avoid: Ensure you’re mixing the cream cheese thoroughly before adding other ingredients to avoid lumps. Also, chilling the bars adequately will prevent them from falling apart when cut.
Expert Tips & Tricks
Storage: Store any leftovers in an airtight container in the fridge for up to 4 days. These bars do well chilled, so they make for great pre-made desserts!
Make-Ahead: These No Bake Key Lime Pie Bars can be made up to 2 days in advance, making them ideal for hosting. Just keep them covered in the fridge until serving.
Troubleshooting: If your filling seems too runny, ensure you’ve chilled them for plenty of time. If you’d like a firmer texture, consider adding a bit more cream cheese.
Ingredient Swaps: If dairy is an issue, you can swap out the cream cheese for a non-dairy cream cheese alternative. Coconut cream can also be a delicious substitute for the whipping cream!
Serving Suggestions: Pair these bars with fresh fruit like berries for added color and sweetness, or serve alongside a scoop of vanilla ice cream for an indulgent treat.
Serving Suggestions
These No Bake Key Lime Pie Bars are perfect on their own but can be paired with a dollop of fresh whipped cream or served alongside seasonal fruits like strawberries or raspberries for added color and flavor. They’re also wonderful for special occasions—think summer picnics or holiday potlucks! Consider garnishing the serving plate with extra lime wedges or a sprinkle of crushed graham crackers for a visually stunning presentation.
Variations & Substitutions
Berry Twist: Add fresh berries on top of the bars to enhance the flavor; strawberries or blueberries provide a delicious contrast and a splash of color.
Tropical Flavors: Swap in coconut extract for a tropical flair or add crushed pineapple to the filling for a piña colada vibe.
Dietary Adaptations: Use gluten-free graham crackers or a nut-based crust for a gluten-free version. For a vegan alternative, consider plant-based cream cheese and whipped coconut cream.
Seasonal Flavors: You can modify the citrus flavor based on the season; try blood orange juice in place of lime or even lemon for an equally tantalizing experience.
Nutrition & Storage Info
- Prep Time: 30 minutes
- Chill Time: 4 hours
- Total Time: 4 hours 30 minutes
- Yield: Approximately 16 squares
- Estimated Calories: 220 calories per serving (based on 1 square)
- Storage Instructions: Best kept in the refrigerator for up to 4 days, or you can freeze them for longer storage (up to 2 months). Just make sure to wrap each bar individually!
FAQ Section
Can I use regular limes instead of key limes?
Yes, regular limes will work fine, though the flavor may be slightly less sweet and tangy.How do I know when the bars are set?
The bars should feel firm to the touch, and a toothpick inserted in the center should come out clean.Can I make these gluten-free?
Absolutely! Use gluten-free graham crackers for the crust.What’s the best way to cut the bars?
Use a sharp knife dipped in warm water for clean cuts between the bars.Is it necessary to use food coloring?
No, the food coloring is optional; it’s just for aesthetic appeal.How far in advance can I make these bars?
You can make them up to 2 days in advance, making them perfect for parties.Can I substitute cream cheese with something else?
Yes, you can use a non-dairy cream cheese alternative if you have dietary restrictions.What if I can’t find key limes?
Bottled key lime juice can be used as an alternative, but fresh lime juice is always recommended when possible.How should I store leftover bars?
Store them in an airtight container in the refrigerator for up to 4 days.Can I eat these bars warm?
These bars are intended to be served chilled for the best flavor and texture.
Conclusion
These No Bake Key Lime Pie Bars are not just a dessert; they are a celebration of flavors and memories. Each bite brings a taste of summer joy, making them a must-try treat in your kitchen. I encourage you to give this recipe a try—your taste buds will thank you! Don’t forget to share your thoughts and experiences. If you love citrus desserts as much as I do, be sure to check out other delicious recipes on my blog, where citrusy delights await! Happy baking!

No Bake Key Lime Pie Bars
Ingredients
Method
- Combine the graham cracker crumbs, melted butter, and granulated sugar in a medium-sized bowl. Mix until it resembles damp sand.
- Firmly press the crumb mixture into a lined square pan (an 8x8 inch pan works well). Refrigerate for at least 10 minutes.
- In a large mixing bowl, beat the softened cream cheese using an electric mixer until smooth and creamy.
- Gradually add the sweetened condensed milk, mixing until incorporated.
- Gently fold in the fresh lime juice, lime zest, vanilla extract, and food coloring.
- Pour the luscious filling over the chilled crust. Use a spatula to spread it evenly.
- Cover the pan with plastic wrap and chill in the refrigerator for at least 4 hours (or overnight) until the filling is firm.
- Once the filling is set, in a mixing bowl, whip the heavy cream with powdered sugar until soft peaks form—about 3-5 minutes.
- Cut the dessert into squares. Add a swirl of whipped cream on each bar and garnish with a sprinkle of lime zest. Enjoy!