
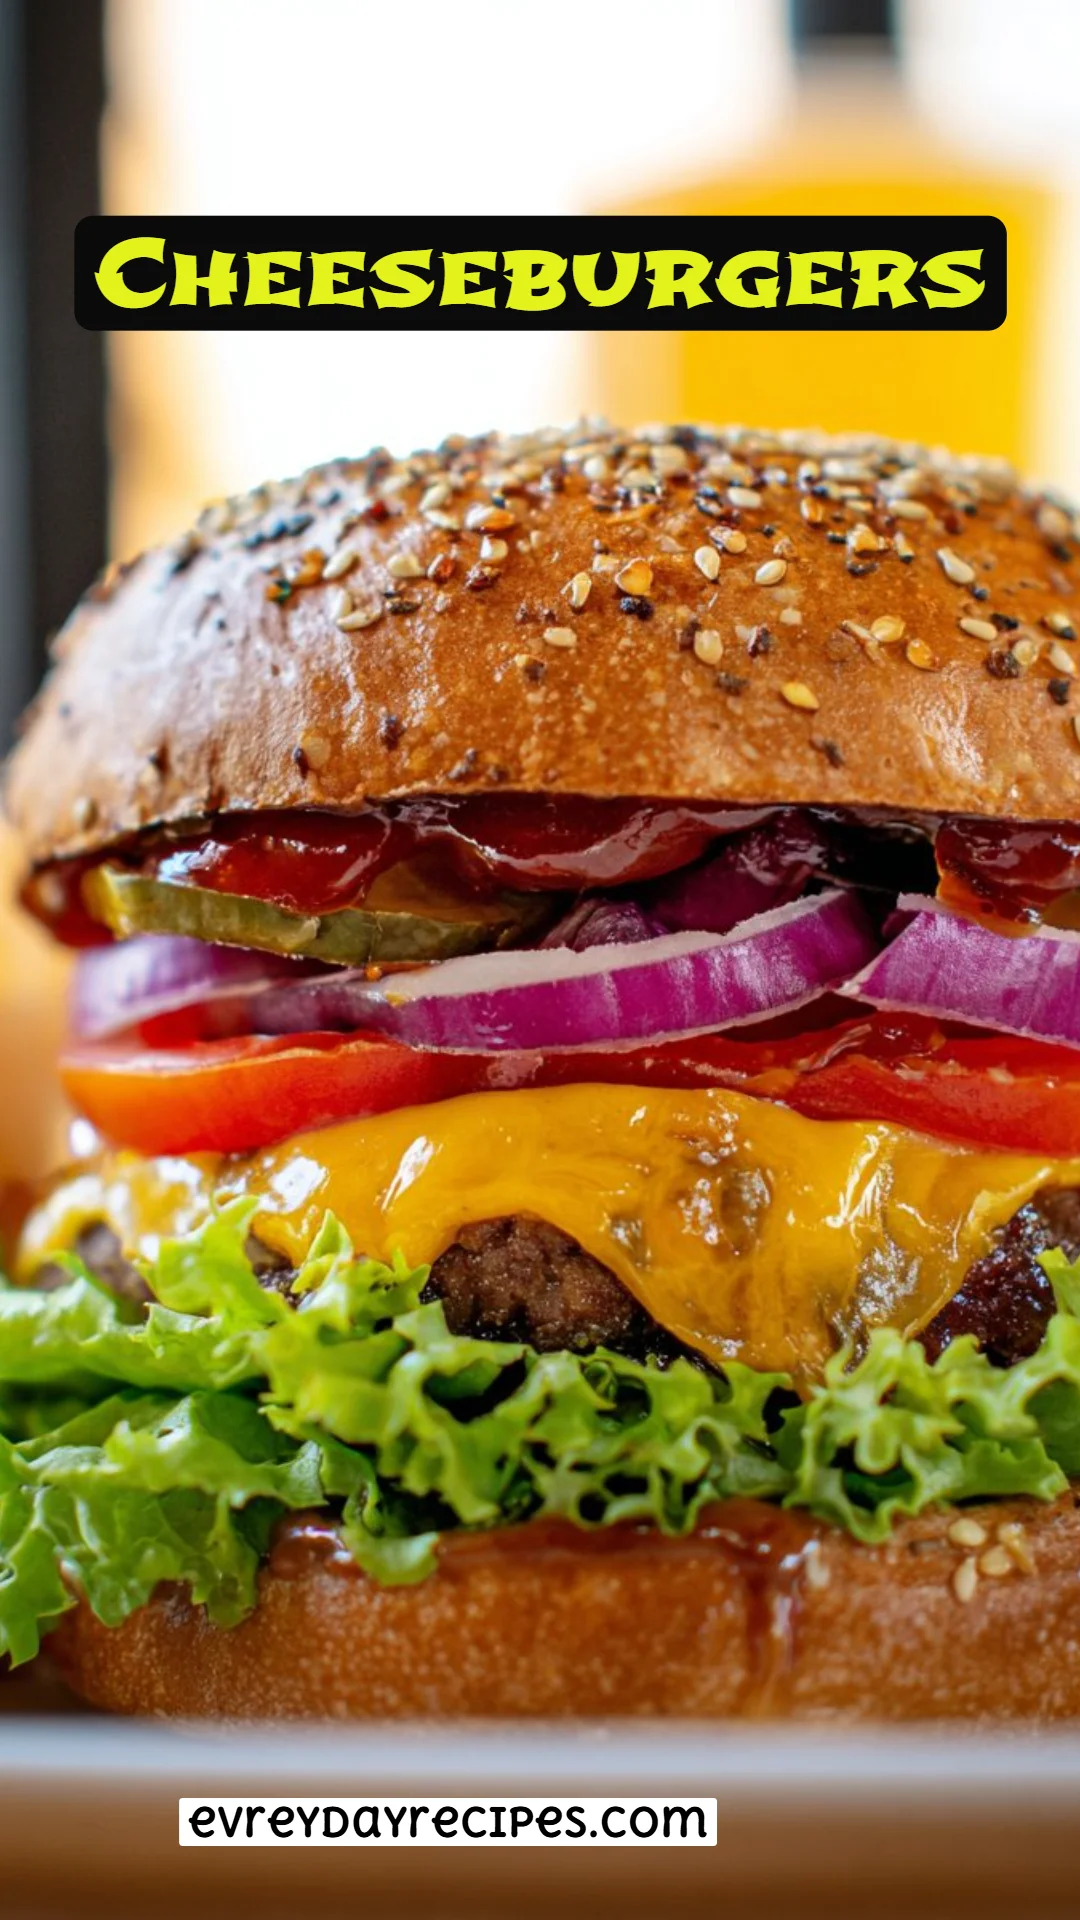
Irresistible Cheeseburgers: The Ultimate Comfort Food Recipe
There’s something magical about the sizzle of a cheeseburger sizzling away in a hot pan. It brings back sweet memories of summer barbeques and family gatherings in my backyard. I remember my dad meticulously flipping the patties, while my mom laid out a colorful spread of toppings that would have any burger-lover drooling. Our cheeseburgers weren’t just meals; they were moments—filled with laughter, stories, and sometimes a little chaos as we tried to get everything on the bun without it toppling over.
This cheeseburger recipe is special not just because it’s mouthwateringly delicious, but because it’s packed with the love and nostalgia of those family moments. Unlike generic fast food versions that often leave you feeling unsatisfied, these homemade cheeseburgers are juicy, flavorful, and full of surprises. Trust me, once you try this recipe, you’ll understand why making your own burgers is a game-changer.
In this post, not only will you learn how to whip up the perfect cheeseburger, but I’ll also share little tips and tricks to make them even more mouthwatering. So grab your aprons and let’s embark on this delicious journey together!
What Are Cheeseburgers?
Cheeseburgers have an interesting origin story that dates back to the 1920s in the United States. Some say they originated from a simple hamburger sandwich where a slice of cheese was added to enhance flavor and creamy texture. Now, it has become a classic American staple found in diners, BBQs, and gatherings all over the world.
When you take a bite of a cheeseburger, you’re greeted with a beautiful juxtaposition of flavors and textures—that juicy beef patty, warm melty cheese, and freshly baked bun create a symphony for the taste buds. What makes cheeseburgers unique is not only the combination of ingredients but also the endless possibilities of customization. Whether you prefer tangy BBQ sauce, spicy jalapeños, or fresh guacamole, you can make it your own!
Cheeseburgers are perfect for family dinners, backyard barbecues, or any occasion that calls for a hearty and satisfying meal. They’re versatile, quick to prepare, and oh-so-delicious!
Why You’ll Love This Recipe
Homemade Goodness: Unlike store-bought options which can be bland and overly processed, these cheeseburgers are made with fresh, high-quality ingredients that you choose. Plus, you can leave out the preservatives!
Customization Galore: One of my favorite aspects of this recipe is how customizable it is! You can easily switch up the cheeses, add jalapeños for a spicy kick, or even go for a bacon cheeseburger if you want that smoky flavor.
Budget-Friendly: Making your own cheeseburgers means you’ll save a ton of money compared to eating out at a restaurant. This recipe can feed your whole family without breaking the bank, making it not only delicious but economical!
Simple to Make: Don’t let the thought of crafting your own cheeseburgers intimidate you! This recipe is straightforward, making it perfect for beginner cooks. You’ll be impressing family and friends in no time!
Love from the Whole Family: I’ve made these cheeseburgers for weeks on end, and every time I hear my family’s delighted reactions—each one claiming they’re the “best burgers ever!” Trust me, this recipe is a crowd-pleaser that will leave everyone asking for seconds.
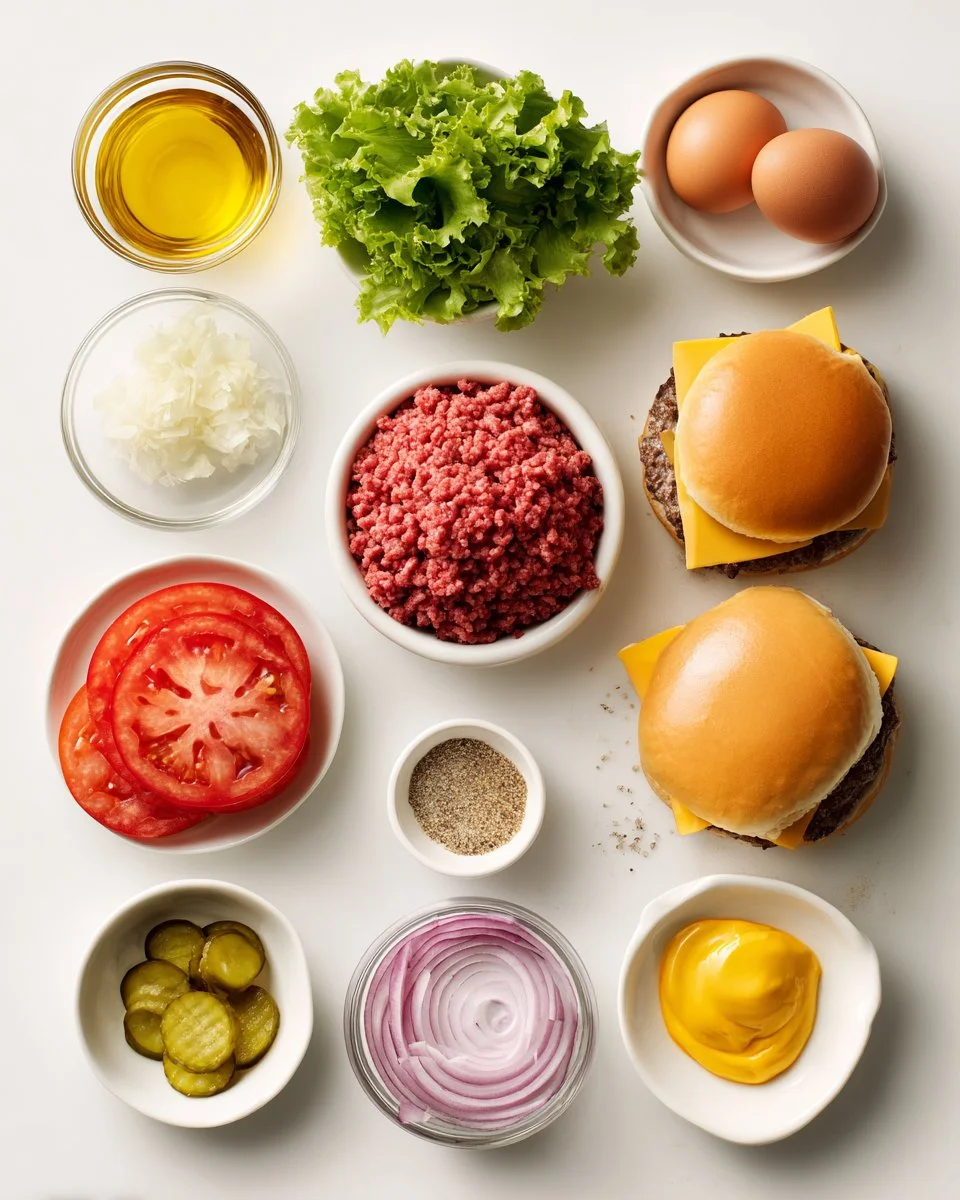
Ingredients Section
Here’s what we’ll be using to create these mouthwatering cheeseburgers:
- 1 tablespoon canola oil: For cooking the burgers evenly.
- 1 1/2 pounds ground beef (preferably 80/20 for a good fat-to-lean ratio): Ensures juicy patties.
- 1/2 cup yellow onion, minced: Adds flavor right into the meat.
- 1 teaspoon Worcestershire sauce: For an extra depth of flavor.
- 1 large egg: Binds the mixture together.
- 1 teaspoon garlic, minced: A delicious aromatic punch.
- 1 teaspoon garlic powder: For that layered garlic flavor.
- 1 teaspoon seasoned salt: To season the blend perfectly.
- 1 tablespoon hamburger seasoning: Feel free to use your favorite blend.
- Salt and pepper, to taste: Basic but essential!
- 4 slices cheddar cheese: Because what’s a cheeseburger without cheese?
- 4 hamburger buns: Choose soft brioche or whole wheat for a twist.
- 1 medium tomato, sliced (optional): Adds freshness!
- 4 large lettuce leaves (optional): For that crunch.
- 1 medium red onion, sliced thin (optional): A tangy crunch.
- Pickle slices (optional): A classic topping for cheeseburgers!
- Ketchup and mustard, to taste (optional): The quintessential condiments.
Notes:
- I recommend using fresh ground beef from a local butcher if possible!
- For a healthier option, you could substitute turkey or chicken for the beef.
- Make sure your ingredients like the ground beef and egg are at room temperature for the best results.
Step-by-Step Instructions
Preheat the Oven: Set your oven rack to the highest level and preheat the oven to 350°F (175°C). This will give you the perfect environment for toasting your buns later.
Mix the Ingredients: In a large bowl, mix the ground beef, minced onion, Worcestershire sauce, egg, minced garlic, garlic powder, seasoned salt, hamburger seasoning, and salt and pepper to taste. Use your hands to fold everything together gently—avoid overmixing to keep the patties tender.
Form the Patties: Divide the meat mixture into equal portions (about the size of a golf ball) and flatten each portion into a round burger about ¾ inch thick.
Cook the Burgers: Heat the canola oil in a non-stick pan over medium heat for about 5 minutes. Once the oil is hot, add your patties and allow them to cook for about 5 minutes on one side without moving them—this helps achieve a nice crust.
Flip and Melt: Flip the burgers only once and repeat on the opposite side for another 3-5 minutes, or until the internal temperature reaches 160°F (for medium doneness). Top each burger with a slice of cheddar cheese and cover with a lid to let it melt—around 5 minutes.
Toast the Buns: While the cheese melts, lightly butter both sides of the hamburger buns (or spray them lightly with cooking spray) and place them in the preheated oven. Toast for about 5 minutes, until warmed through and lightly crispy.
Build Your Burgers: Once everything is ready, build your cheeseburger! Start with the bottom bun, add the cheeseburger patty, top with your favorite fixings like lettuce, tomato, onions, pickles, ketchup, and mustard. Finish with the top bun and serve immediately!
Chef’s Tip: Avoid pressing down on the burgers while they cook; this will keep them juicy and flavorful!
Expert Tips & Tricks
Optimal Cooking Temp: Use a meat thermometer to check for doneness; aim for 160°F to ensure the meat is fully cooked while remaining juicy.
Rest Your Burgers: After cooking, let the burgers sit for a few minutes to redistribute the juices.
Store Properly: Leftover cheeseburgers can be stored in an airtight container in the fridge for up to three days. Reheat on a skillet to retain their juiciness.
Make Ahead: Prepare the patties in advance and refrigerate them for up to a day before cooking. They can also be frozen for up to three months—just thaw them in the refrigerator before cooking.
Common Mistakes: One common mistake is overcrowding the pan. Cook in batches if necessary to ensure even cooking and a nice sear.
Add Flavor: For a gourmet twist, consider adding fresh herbs or spices directly into the meat mixture for extra flavor!
Serving Suggestions
These cheeseburgers are fantastic on their own, but they shine even more alongside classic sides. Think crispy French fries, onion rings, or a side salad. For presentation, stack the completed burgers high, showcasing all the colorful toppings—this will definitely make your guests’ mouths water!
These burgers are perfect for casual weekend gatherings, game days, or even themed parties. The versatility of cheeseburgers allows you to cater to any occasion with ease!
Variations & Substitutions
- Different Cheeses: Swap cheddar for Swiss, pepper jack, or even blue cheese for a richer flavor.
- Lean Protein: You can use ground turkey or chicken instead of beef—just be sure to adjust the cooking time.
- Vegan Option: Try using lentils or black beans as a base for a vegetarian version, and opt for vegan cheese and buns.
- Seasonal Toppings: Take advantage of fresh vegetables in the summer—grilled zucchini, roasted red peppers, or avocado can add a delightful twist!
Nutrition & Storage Info
- Prep Time: 15 minutes
- Cook Time: 15 minutes
- Total Time: 30 minutes
- Yield: 4 servings
- Estimated Calories: Approximately 500 calories per cheeseburger (without toppings)
Storage Instructions:
- Room Temperature: Cheeseburgers should not be left out for more than two hours.
- Refrigerator: Store in an airtight container for up to three days.
- Freezer: Wrap each cooled burger individually and freeze for up to three months. Thaw in the refrigerator before reheating.
FAQ Section
Can I use leaner beef for cheeseburgers?
Yes, but keep in mind that leaner beef may result in drier patties. Aim for at least 80/20 ground beef for optimal juiciness.Do I need to use breadcrumbs in the patties?
No, this recipe works well without breadcrumbs. The egg acts as a binder, making them flavorful and moist.What type of pan is best for cooking cheeseburgers?
A non-stick skillet or a cast iron pan works beautifully. They help to achieve that caramelized crust while keeping them juicy.Can I cook cheeseburgers on an outdoor grill?
Absolutely! Preheat your grill and cook until you reach the desired doneness, about 5-7 minutes per side depending on thickness.What are some good toppings for cheeseburgers?
Popular choices include lettuce, tomato, pickles, fried onions, bacon, and various sauces!Can I freeze cooked cheeseburgers?
Yes! Just let them cool completely, wrap them in foil or freezer bags, and freeze. They can last up to three months in the freezer.How do I know when my cheeseburgers are done?
The best method is to use a meat thermometer—160°F is ideal for ground beef.Can this recipe be doubled?
Definitely! Just make sure to cook in batches if your pan isn’t large enough to accommodate all the patties at once.What’s the best bun for cheeseburgers?
That’s up to personal preference! Brioche buns are soft and buttery, while whole wheat buns add a nutty flavor.How long can leftovers be stored?
Cheeseburgers can be stored in the fridge for about three days or in the freezer for up to three months.

Conclusion
This cheeseburger recipe holds a special place in my heart, filled with the love of family and the joy of good food. The next time you’re in the mood for comfort food, I promise this homemade cheeseburger will not disappoint.
So roll up your sleeves, gather your ingredients, and let your culinary creativity shine! After trying these, I’d love to hear how yours turned out—feel free to leave a comment or share your variations!
And if you’re looking for more delicious recipes, check out my blog for tasty sides and desserts that pair perfectly with your homemade cheeseburgers. Happy cooking!

Cheeseburgers
Ingredients
Method
- Preheat the Oven: Set your oven rack to the highest level and preheat the oven to 350°F (175°C).
- Mix the Ingredients: In a large bowl, mix the ground beef, minced onion, Worcestershire sauce, egg, minced garlic, garlic powder, seasoned salt, hamburger seasoning, and salt and pepper to taste.
- Form the Patties: Divide the meat mixture into equal portions (about the size of a golf ball) and flatten each portion into a round burger about ¾ inch thick.
- Heat the canola oil in a non-stick pan over medium heat for about 5 minutes.
- Add your patties and allow them to cook for about 5 minutes on one side without moving them.
- Flip the burgers only once and repeat on the opposite side for another 3-5 minutes, or until the internal temperature reaches 160°F.
- Top each burger with a slice of cheddar cheese and cover with a lid to let it melt—around 5 minutes.
- Toast the Buns: Lightly butter both sides of the hamburger buns and place them in the preheated oven. Toast for about 5 minutes.
- Build Your Burgers: Start with the bottom bun, add the cheeseburger patty, top with your favorite fixings like lettuce, tomato, onions, pickles, ketchup, and mustard. Finish with the top bun and serve immediately!