
Irresistibly Silky Vanilla Mousse Cake Filling: A Luxurious Delight to Elevate Your Baking
As a passionate home baker, I’ve had countless kitchen adventures, but nothing holds a candle to the exuberance of creating a cake filled with Silky Vanilla Mousse Cake Filling. Imagine a family gathering, laughter echoing through the hall, and everyone eagerly waiting for that first slice of dessert. The anticipation always revs up once they learn I’m serving cake filled with this light, airy cream that practically dances on your palate.
This mousse cake filling isn’t just any dessert filler; it’s a heartwarming infusion of tradition and comfort, layered with memories of family birthdays and cozy gatherings. Unlike many recipes that leave you feeling deflated, this one is foolproof—here’s a promise: you’ll create a filling so outrageously delicious, it will reclaim your crown as the family dessert champion! By the end of this post, you’ll master the art of crafting this delightful filling, ready to elevate your cakes to the next level.
What Are Silky Vanilla Mousse Cake Filling?
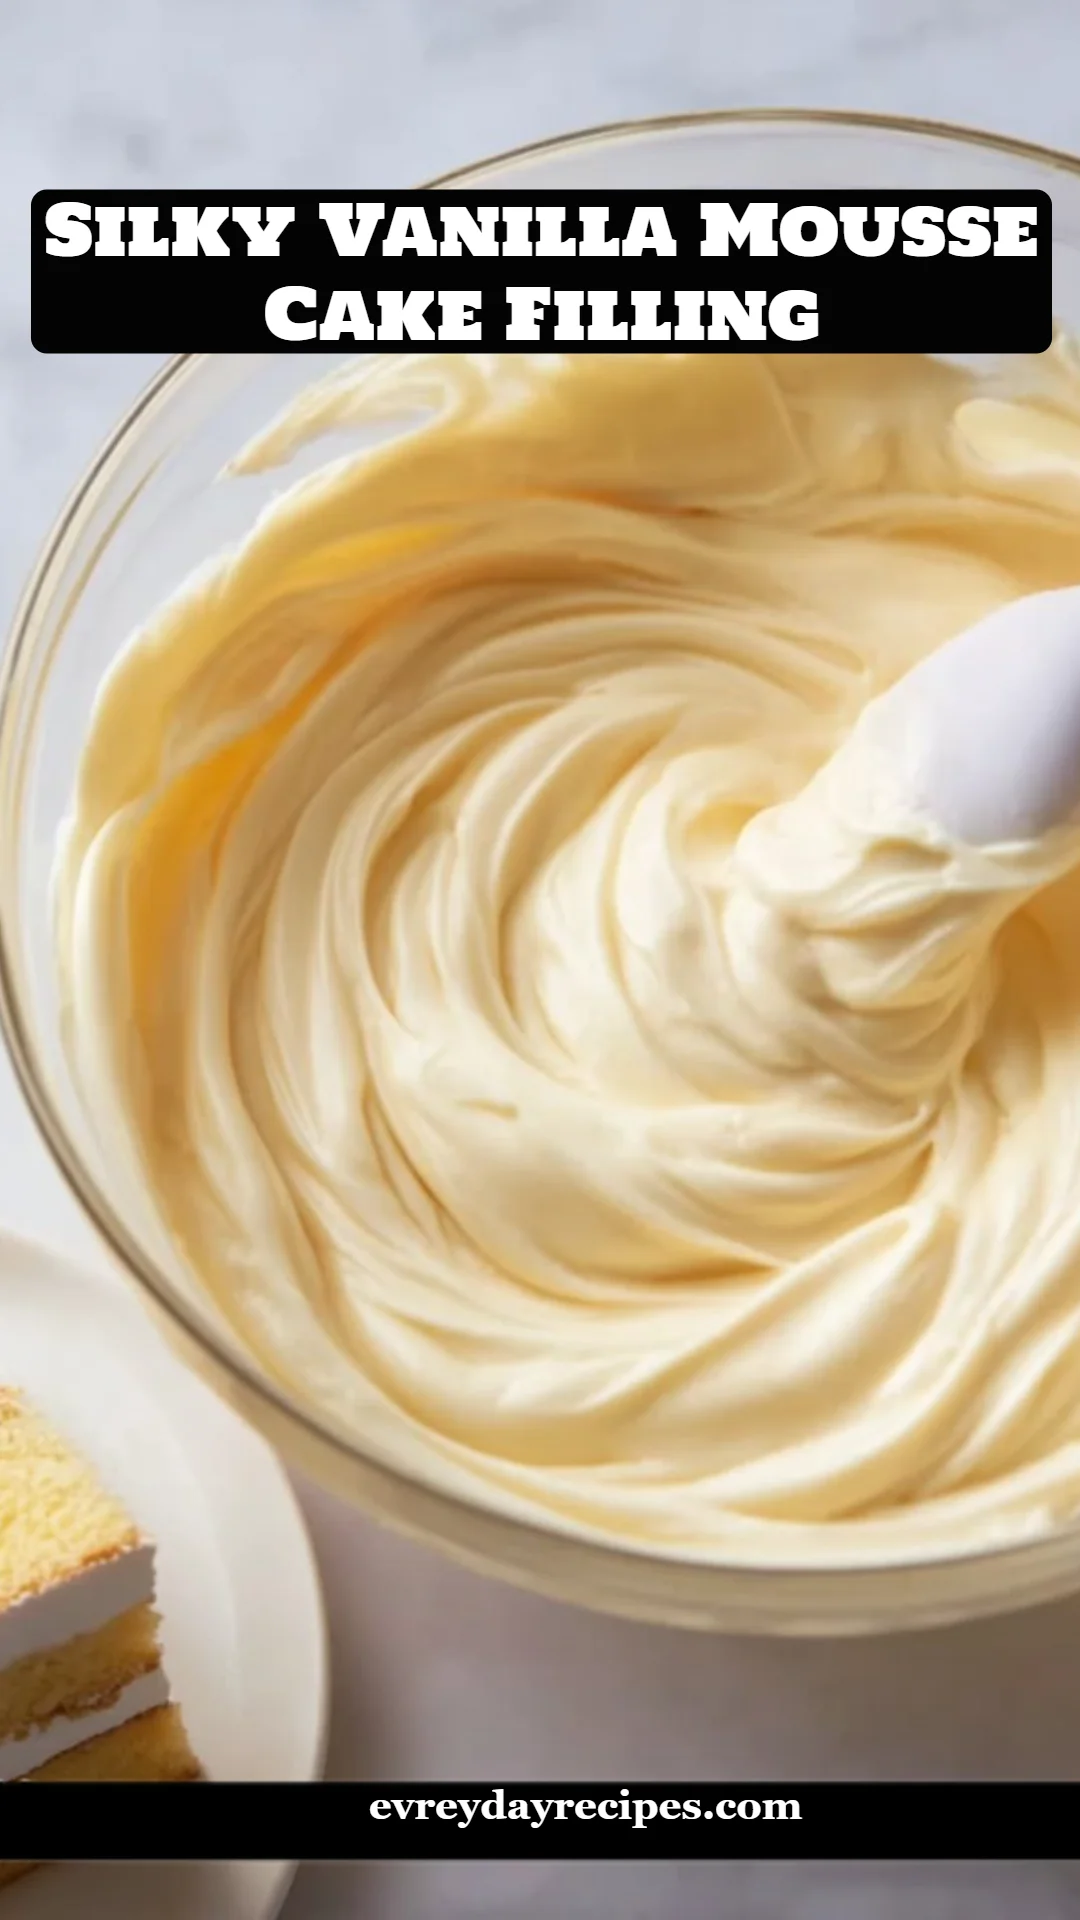
Silky Vanilla Mousse Cake Filling is a luxurious, creamy treat that’s the star of any cake layer. Rooted in classic French pastry, this mousse is designed to be both light and rich, offering a sumptuous experience with each tender bite. The secret lies in the cream cheese base, which creates a smooth texture that beautifully balances the airy whipped cream.
When you indulge in this filling, you’ll be greeted with the comforting aroma of vanilla, complemented by a silky texture that melts effortlessly on your tongue. It’s unique because it marries the richness of cream cheese with the delightful fluffiness of whipped cream, making it the perfect addition for any cake. Whether you’re celebrating a birthday or simply treating yourself, this filling is your go-to for a delightful dessert that never fails to impress.
Why You’ll Love This Recipe
Divine Taste & Texture: This Silky Vanilla Mousse Cake Filling harmonizes cream cheese and whipped cream, resulting in a light yet decadently rich flavor that elevates your cake from ordinary to extraordinary.
Cost-Effective Perfection: Why spend a small fortune on store-bought mousse when you can whip up your own for a fraction of the cost? This homemade version allows you to create bakery-worthy desserts without breaking the bank.
Customization is Key: Want to add a chocolate twist or infuse it with seasonal spices? The world is your oyster! You can easily adjust flavors to suit any occasion or preference, making it practically a canvas for your creativity.
Simple Yet Impressive: If you worry about your baking skills, have no fear! This recipe isn’t complicated, yet it yields results that will wow your guests—making it the perfect choice for novice bakers and seasoned pros alike.
Make It Ahead: Need some downtime during party preparations? The mousse can be prepared ahead of time; just chill it until you’re ready to assemble your cake. It’s a lifesaver for busy hosts!
Ingredients
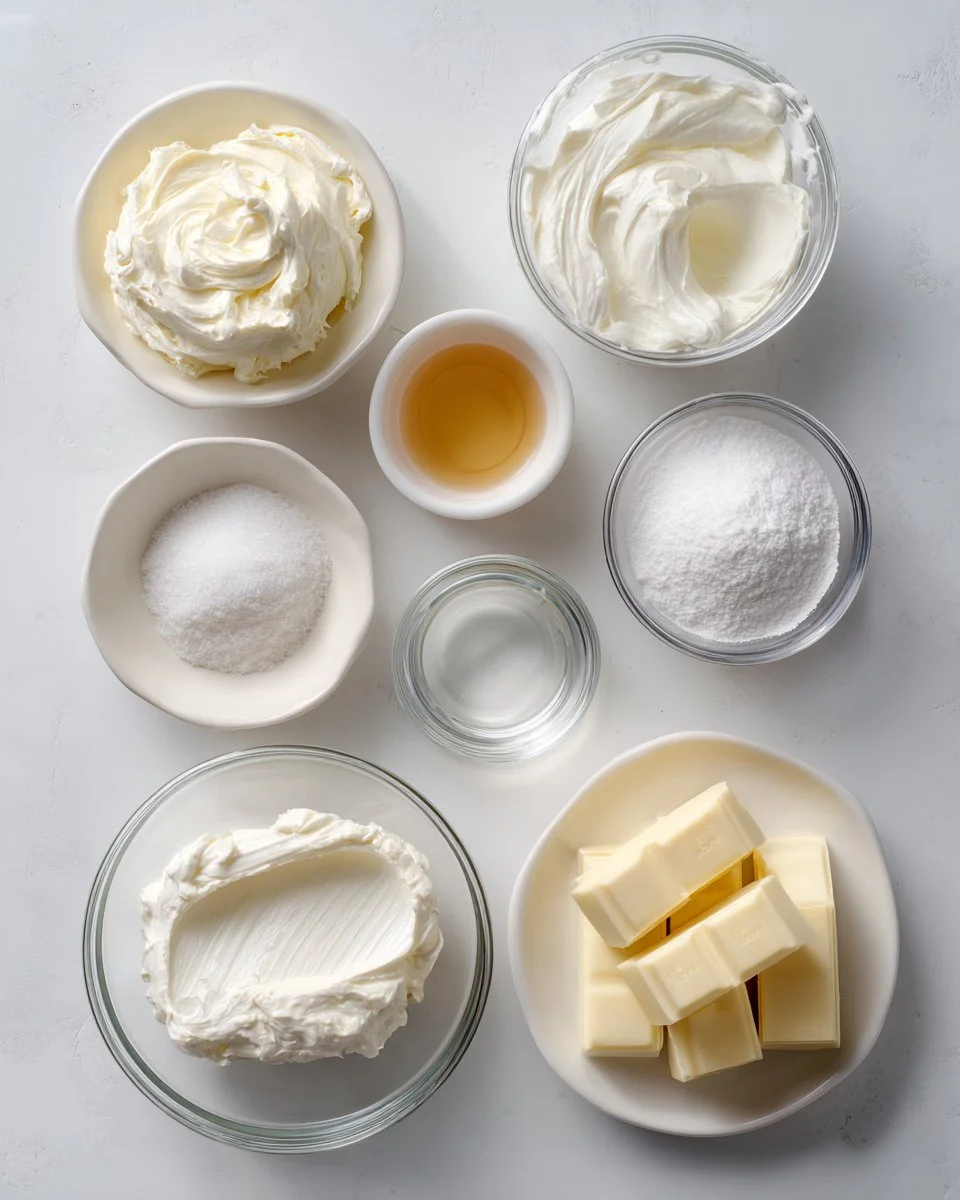
To create this delightful Silky Vanilla Mousse Cake Filling, gather the following ingredients:
1 1/2 cups (360 ml) heavy whipping cream, cold: Ensure it’s very cold for the best whipping results—organic varieties often produce richer flavors.
8 oz (225 g) cream cheese, softened: Use full-fat cream cheese for creaminess; let it sit at room temperature to soften properly.
1/2 cup (100 g) granulated sugar: This will sweeten the mousse; feel free to use less if you prefer a subtler sweetness.
1 tablespoon powdered sugar: For stabilizing the whipped cream, this will help it hold its shape.
2 teaspoons pure vanilla extract: Always opt for pure vanilla extract—its flavor is unmatched compared to the synthetic version.
1 teaspoon vanilla bean paste (optional): Adds a beautiful texture and signature vanilla flavor; consider brands like Nielsen-Massey for quality.
1 tablespoon gelatin powder: This acts as a stabilizer to help the mousse keep its shape—be sure to use unflavored gelatin.
3 tablespoons cold water: To bloom the gelatin. Use filtered water for a cleaner taste.
Pinch of salt (optional): Enhances the flavors but can be omitted if you’re sensitive to salt.
2 tablespoons white chocolate, melted and cooled (optional): For an extra touch of sweetness and richness, consider good-quality chocolate like Ghirardelli’s for the best flavor.
Step-by-Step Instructions
BLOOM THE GELATIN: Sprinkle gelatin over cold water in a small bowl and let it sit for 5 to 10 minutes until fully hydrated and thickened. This step is crucial for a smooth filling.
MIX THE CREAM CHEESE BASE: In a mixing bowl, beat the softened cream cheese until smooth, then add granulated sugar and mix until fully combined and free of lumps. Visual cue: it should become creamy and glossy.
ADD THE FLAVORING: Mix in vanilla extract, vanilla bean paste, and optional salt until evenly incorporated and aromatic—take a moment to inhale that beautiful scent!
MELT THE GELATIN: Heat the bloomed gelatin in the microwave for just 10 to 15 seconds until fully liquid but not boiling. Pour it slowly into the cream cheese mixture while continuously mixing to prevent clumping.
WHIP THE CREAM: In a separate bowl, whip the cold heavy cream with powdered sugar until soft peaks form—this should take about 2-4 minutes.
FOLD THE MIXTURE: Gently fold the whipped cream into the cream cheese base in batches, using slow, sweeping motions. This will keep it airy and fluffy—avoid over-mixing!
CHILL BEFORE USING: Refrigerate the mousse for 20 to 30 minutes until it’s slightly set and easy to spread between cake layers.
Expert Tips & Tricks
Use Fresh Ingredients: For the best flavor, always use the freshest cream, cream cheese, and vanilla.
Gelatin Tip: If at any point your mousse looks too runny, make a new batch of bloomed gelatin and add it in—this will help provide texture.
Chill Your Equipment: For even better whipped cream, chill your mixing bowls and beaters—this keeps everything cool and whips faster.
Storage Recommendations: You can store your mousse in an airtight container in the fridge for up to 3 days. Don’t freeze; that could ruin the consistency!
Make-ahead Instructions: Prepare your mousse a day ahead. Allow it to set overnight, giving you more freedom the next day.
Troubleshooting: If your whipped cream isn’t holding up, whip in a bit more powdered sugar for stability.
Serving Suggestions
When it’s time to serve your Silky Vanilla Mousse Cake Filling, consider these delightful options:
Pair the cake with a raspberry coulis or fresh berries for a tart contrast that cuts through the sweetness.
Add a sprig of mint for a refreshing touch on top of each slice.
For a stunning presentation, dust the top with cocoa powder or a light sprinkle of edible glitter.
This filling is versatile enough to suit birthdays, anniversaries, or simply a family dessert night!
Variations & Substitutions
Feel free to explore different flavor profiles using this recipe:
Chocolate: Add melted chocolate to the cream cheese base for a decadent chocolate mousse.
Coffee: Incorporate espresso powder for a mocha-inspired twist.
Seasonal Spices: During the holidays, add cinnamon or nutmeg for an autumn-Christmas fusion.
Dietary Adaptations: Substitute dairy with coconut cream or a nut-based cream cheese for a vegan version. Ensure the gelatin is plant-based if you go this route!
Nutrition & Storage Info
- Prep time: 20 minutes
- Chill time: 30 minutes
- Total time: 50 minutes
- Yield: Serves 8-10
- Estimated calories per serving: 200 calories
Storage Instructions:
- Room temperature: Not recommended.
- Refrigerate for up to 3 days.
- Freezer: Do not freeze.
FAQ
1. Can I use gelatin sheets instead of powder?
Absolutely! Use 1 sheet for every tablespoon of powdered gelatin; remember to bloom them in water before using.
2. Is there a substitute for cream cheese?
Yes! You can use mascarpone or a vegan cream cheese for different flavor profiles.
3. How do I serve the filling?
Spread it between layers of cake or in desserts like trifles; it’s also great in tarts!
4. Can I make this recipe ahead of time?
Definitely! Prepare 1-2 days in advance, and store it in the fridge until you’re ready to use it.
5. Will this filling help keep my cake moist?
Yes! The mousse adds moisture and a delightful texture, enhancing your overall cake experience.
6. What if my whipped cream deflates?
Ensure that your ingredients are cold, and don’t over-stir once combined. If it deflates, re-whip with more powdered sugar.
7. Can I use flavored extracts?
Of course! Almond or hazelnut extracts can introduce new flavors. Just use them sparingly.
8. Is this mousse gluten-free?
Yes! All the ingredients are naturally gluten-free.
9. How do I fix a runny mousse?
Add bloomed gelatin to the mixture, or let it chill longer; it should firm up.
10. Can I use this mousse for cupcakes?
Yes! Just find the right piping tip to create swirls or dollops of that delightful mousse filling.
Conclusion
This Silky Vanilla Mousse Cake Filling is truly a game-changer for your desserts. Not only does it bring incredible taste and texture, but it also holds dear memories and family traditions. I encourage you to try this recipe and experience joy in every fluffy bite. Your friends and family will thank you! I’d love to hear your thoughts in the comments and encourage you to check out my other cake recipes for more delicious inspiration!

Silky Vanilla Mousse Cake Filling
Ingredients
Method
- BLOOM THE GELATIN: Sprinkle gelatin over cold water in a small bowl and let it sit for 5 to 10 minutes until fully hydrated.
- MIX THE CREAM CHEESE BASE: Beat the softened cream cheese until smooth, then add granulated sugar and mix until creamy and glossy.
- ADD THE FLAVORING: Mix in vanilla extract, vanilla bean paste, and optional salt until aromatic.
- MELT THE GELATIN: Heat the bloomed gelatin in the microwave for 10 to 15 seconds until fully liquid. Pour it into the cream cheese mixture while mixing.
- WHIP THE CREAM: In a separate bowl, whip the cold heavy cream with powdered sugar until soft peaks form.
- FOLD THE MIXTURE: Gently fold the whipped cream into the cream cheese mixture in batches.
- CHILL BEFORE USING: Refrigerate the mousse for 20 to 30 minutes until slightly set.